Baymax - User Guide
Table of Contents
-
Introduction
-
About
2.1. Structure of this Document
2.2. Reading this Document
2.2.1. Sections of the Application Window
2.2.2. Special Formats
2.2.3. Command Format
-
Quick Start
-
Navigation Between Tabs
-
Features
5.1. Patient Information Management
5.1.1. Add a new patient:addpatient
5.1.2. List all patients:listpatients
5.1.3. Edit a patient’s information:editpatient
5.1.4. Add a remark to a patient:remark
5.1.5. Find patient by name:findpatient
5.1.6. Delete a patient profile:deletepatient
5.2. Appointment Information Management
5.2.1. Add a new appointment:addappt
5.2.2. List all appointments:listappts
5.2.3. List all appointments of a patient:listapptsof
5.2.4. Edit an appointment:editappt
5.2.5. Mark an appointment as done:done
5.2.6. Mark an appointment as missed:missed
5.2.7. Find appointment by keyword:findappt
5.2.8. Cancel an appointment:cancel
5.3. Calendar
5.3.1. Switch to a particular year:year
5.3.2. Switch to a particular month:month
5.3.3. Display schedule of a particular day:day
5.4. Utilities
5.4.1. View help :help
5.4.2. Exit the program:exit
5.4.3. Clear all data:clear
5.5. Features coming in Version 2.0
5.5.1. Undo/Redo v2.0
5.5.2. Display appointments within a period v2.0
-
FAQ
-
Command Summary
7.1. Patient Information Management Commands
7.2. Appointment Information Management Commands
7.3. Calendar Commands
7.4. Utility Commands
1. Introduction
(Contributed by Li Jianhan & Shi Hui Ling)
Welcome to Baymax! Are you a clinic receptionist looking for a reliable app to keep track of patients and appointments? You have come to the right place!
Baymax is a Command Line Interface (CLI) focused desktop application that helps you to manage patient appointments using just the keyboard itself, no fiddling with the mouse needed. The main features include:
- Appointment management
- Patient information management
- Calendar view
With Baymax, you can manage appointments efficiently with our integrated Calendar tool. We have put a lot of effort into designing our User Interface so that it feels as intuitive to first-time users as it can be. You will be amazed by what you can achieve with Baymax through a clean and simple User Interface. What are you waiting for? Head on to Section 3 Quick Start!
2. About
(Contributed by Li Jianhan, Thuta Htun Wai, Kaitlyn Ng, Reuben & Shi Hui Ling)
This section will familiarise you with the general terms and information you need to know to make the best use of this User Guide!
2.1. Structure of this Document
To give you the most amount of flexibility over what you can do with Baymax, we have provided a large set of features. We have structured this User Guide in such a way that you can easily find what you need. In the next subsection, Section 2.2 Reading this Document, you will find useful tips on using this document. All of Baymax’s features and commands are documented in the following section, Section 5 Features. You can sift through these features and commands easily by referring to the Table of Contents at the top of this User Guide, or to Section 7 Command Summary.
2.2. Reading this Document
This subsection familiarises you with all the technical terms, symbols and expressions that are used throughout this document, in order to make it easier for you to read it.
2.2.1. Sections of the Application Window
We will be referring to certain parts of the application window by their names as shown in the image below:
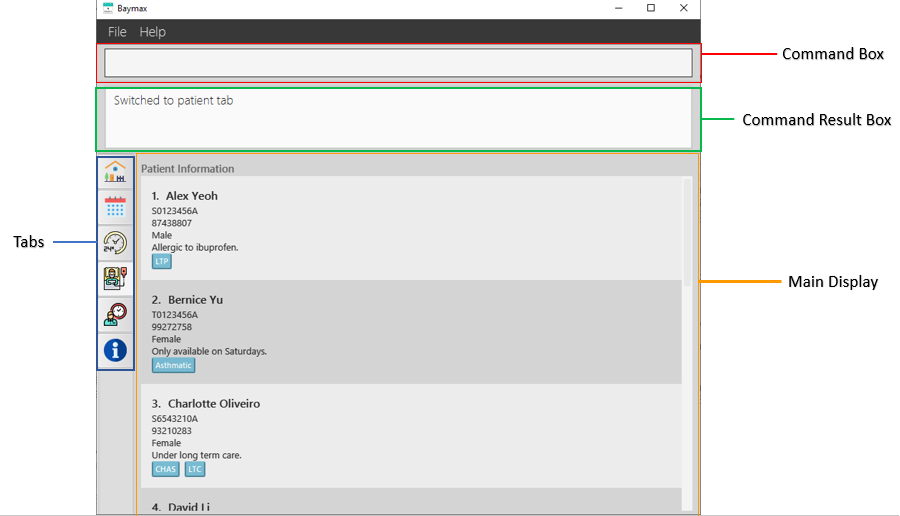
Figure 2.2.1a. Sections of the Application Window
| Section of Window | Description |
|---|---|
| Command Box | Commands are entered here. |
| Command Result Box | Success and error messages after running commands are displayed here. |
| Tabs | Dashboard, Calendar, Schedule, Patient, Appointment, and Additional Information tabs can be accessed here. Note that the tabs are not clickable. See Section 4 Navigation Between Tabs to find out how to navigate between tabs. |
| Main Display | Calendar views, Patient lists and Appointment lists are displayed here in their respective tabs. |
2.2.2. Special Formats
The table below explains some special terms and formatting used throughout this document.
| Formatting | What does it mean? |
|---|---|
| underlined | Underlined text gives you information that you need to pay more attention to. |
command |
Highlighted text in this particular font indicates a command that can be typed into the Command Box and run by the application. |
|
|
This symbol gives you special tips regarding the specific command/feature. |
|
|
The warning icon tells you to take caution before using the command/feature. |
2.2.3. Command Format
To use Baymax’s features and perform tasks, you can enter specific commands into the Command Box.
Most of the commands take the following format:
command_word prefix/INPUT, e.g. addpatient name/Alex Yeoh nric/S1234567A phone/98765432 gender/M
-
command_word: word that specifies the task being performed, e.g.
addpatient -
prefix: word that specifies the input type being supplied, e.g.
name,nric -
INPUT: information and details about various patients and appointments specified by you, e.g.
Alex Yeoh -
Field: a type of input information, i.e. a
prefix/INPUTset, e.g.name/Alex Yeoh
![]() Notes about the command format:
Notes about the command format:
-
Words in
UPPER_CASEare the inputs to be supplied by you.E.g.
addpatient name/NAME: can be used asaddpatient name/Alice Tan -
Time should be input in HH:MM format following the 24-hour System.
E.g.
01:00for 1 a.m. and13:00for 1 p.m. -
Fields in square brackets are optional.
E.g.
name/NAME [r/REMARK]: can be used asname/Alice Tan r/No drug allergyor asname/Alice Tan. -
You can use fields with
…after them 0 or more times.E.g.
[tag/TAG]…: can be used astag/braces,tag/braces tag/cleaningetc. -
You cannot supply a field more than once unless it is specified with
....E.g. Entering
addpatient name/John name/Jane nric/S1234567G phone/12345678 gender/Fwill give: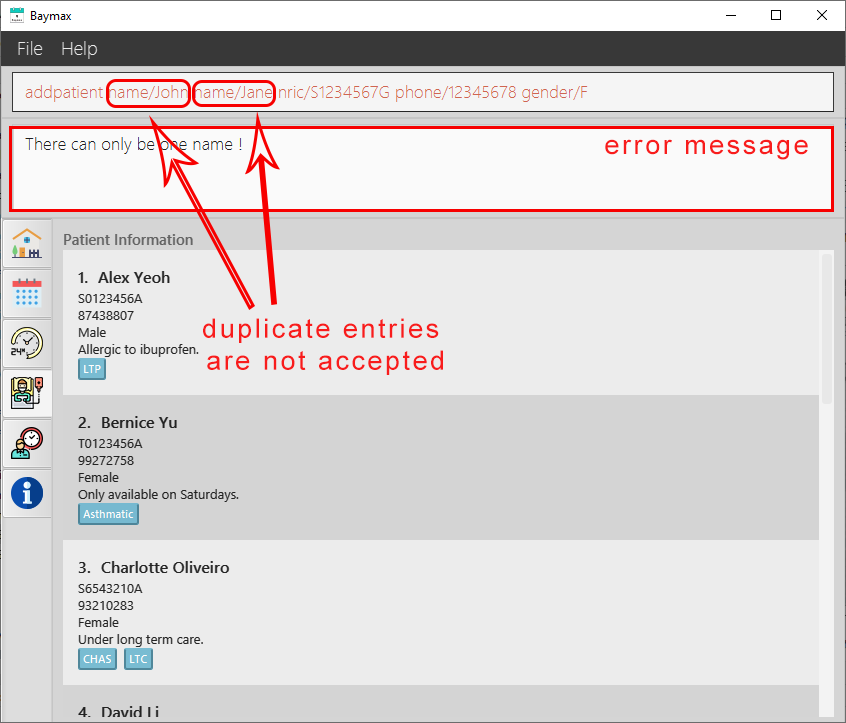
Figure 2.2.3a. Multiple inputs of a unique field is not accepted -
You can supply fields in any order.
E.g.
name/NAME phone/PHONE_NUMBER: can also be used asphone/PHONE_NUMBER name/NAME.
Some of the commands also take the following format instead:
command_word INDEX prefix/INPUT, e.g. addappt 3 on/11-02-2020 14:00 dur/60 desc/Regular checkup
In these commands, you specify a patient or appointment using its INDEX. For instance, in the above addappt command, the INDEX value 3 is used to refer to a particular patient. You can find the INDEX of a patient by looking at the number next to their name in the Patient Tab.
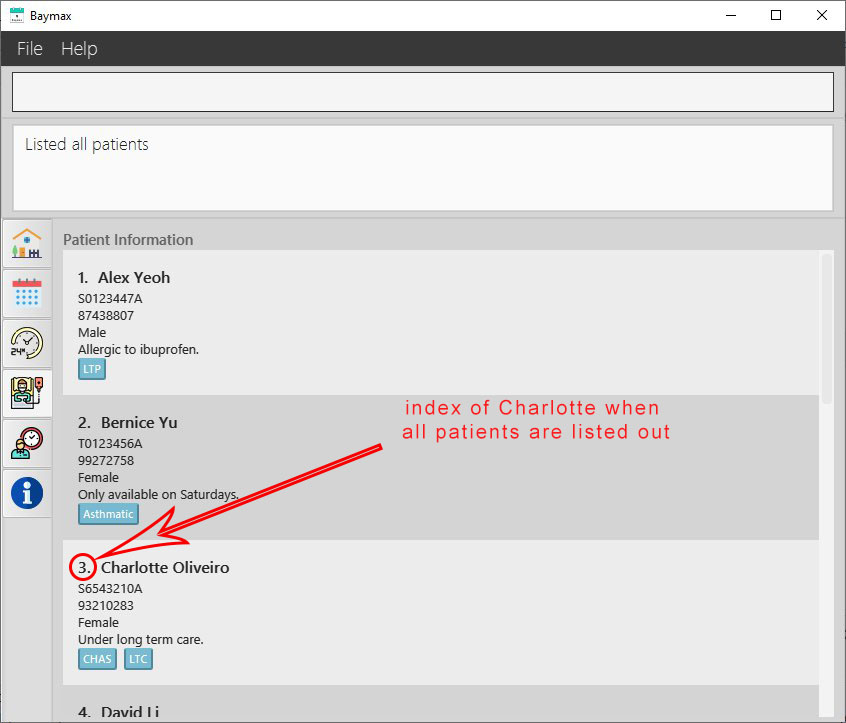
Figure 2.2.3b. Charlotte Oliveiro with index 3
Note that the INDEX of a patient can change based on the current list of patients displayed. As shown above, the patient Charlotte Oliveiro has the INDEX 3, but in the filtered list below, the same patient has the INDEX 1. The INDEX of the patient will follow the most recent list of patients being displayed.
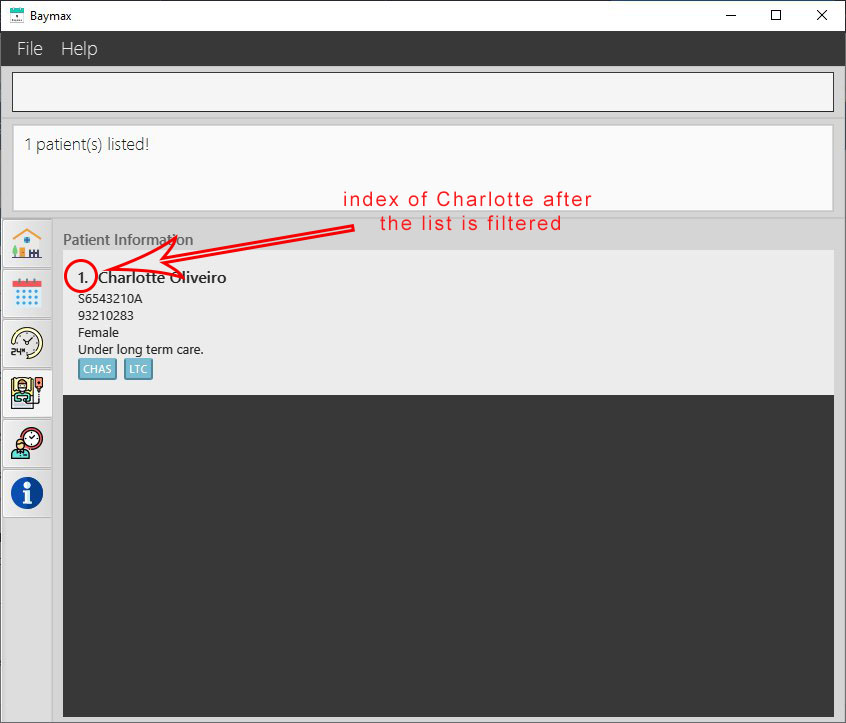
Figure 2.2.3c. Charlotte Oliveiro with index 1
You can obtain the INDEX of appointments in the same manner.
3. Quick Start
(Contributed by Kaitlyn)
-
Ensure you have Java
11or above installed in your Computer. -
Download the latest version,
v1.4, of Baymax from here. -
Copy the
.jarfile to the folder you want to use as the home folder for your Baymax application. -
Double-click the
.jarfile to start the app. A window similar to the image below should appear in a few seconds. This is your dashboard.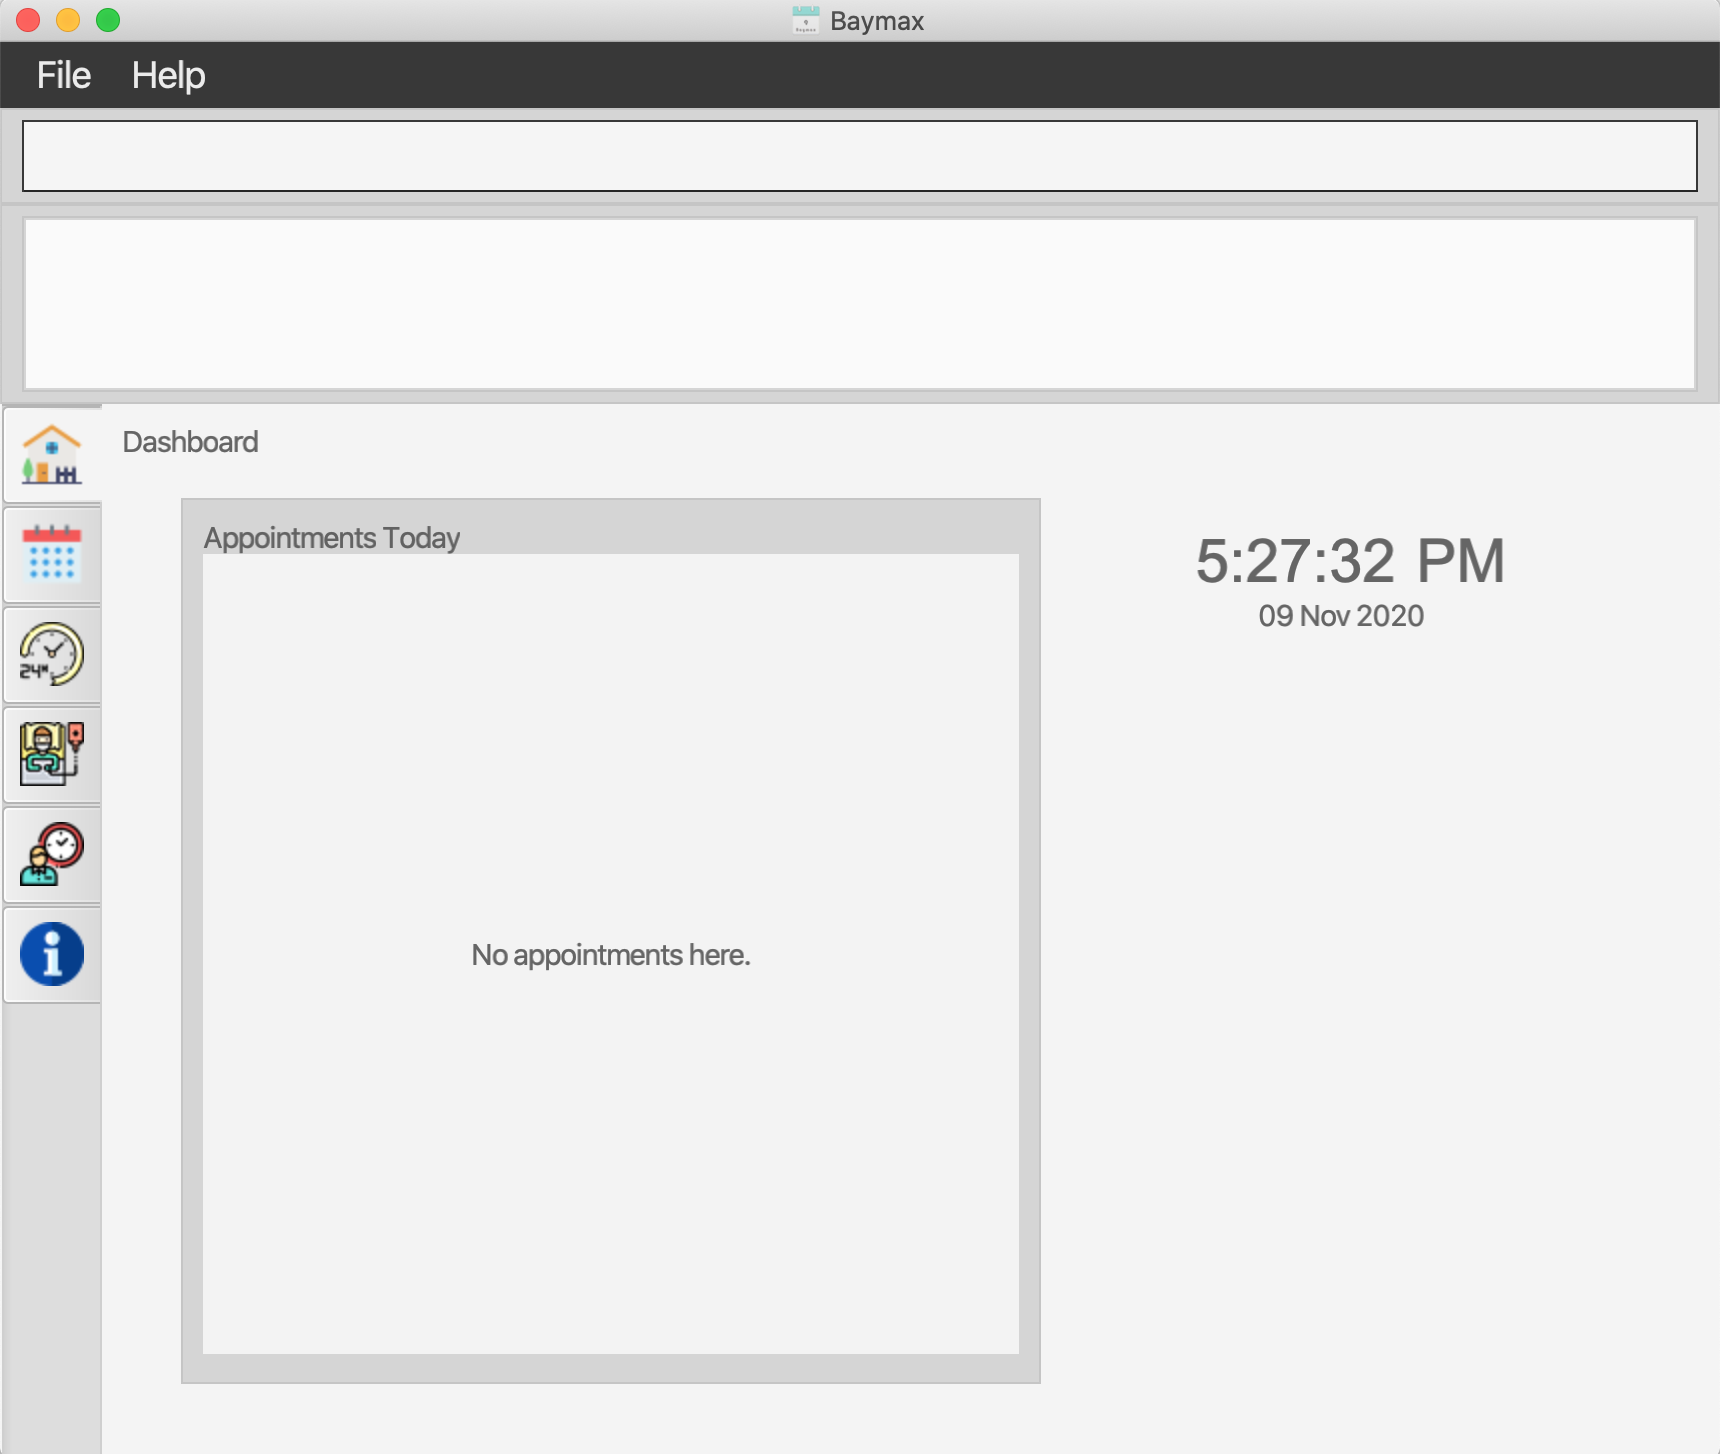
Figure 3a. Baymax Dashboard -
When the app is first started, it will contain some sample patients and appointments for you to explore. If you want to take a look at the appointments, for instance, you can type
listapptsinto the Command Box and press Enter. You will then be brought to the appointment information tab.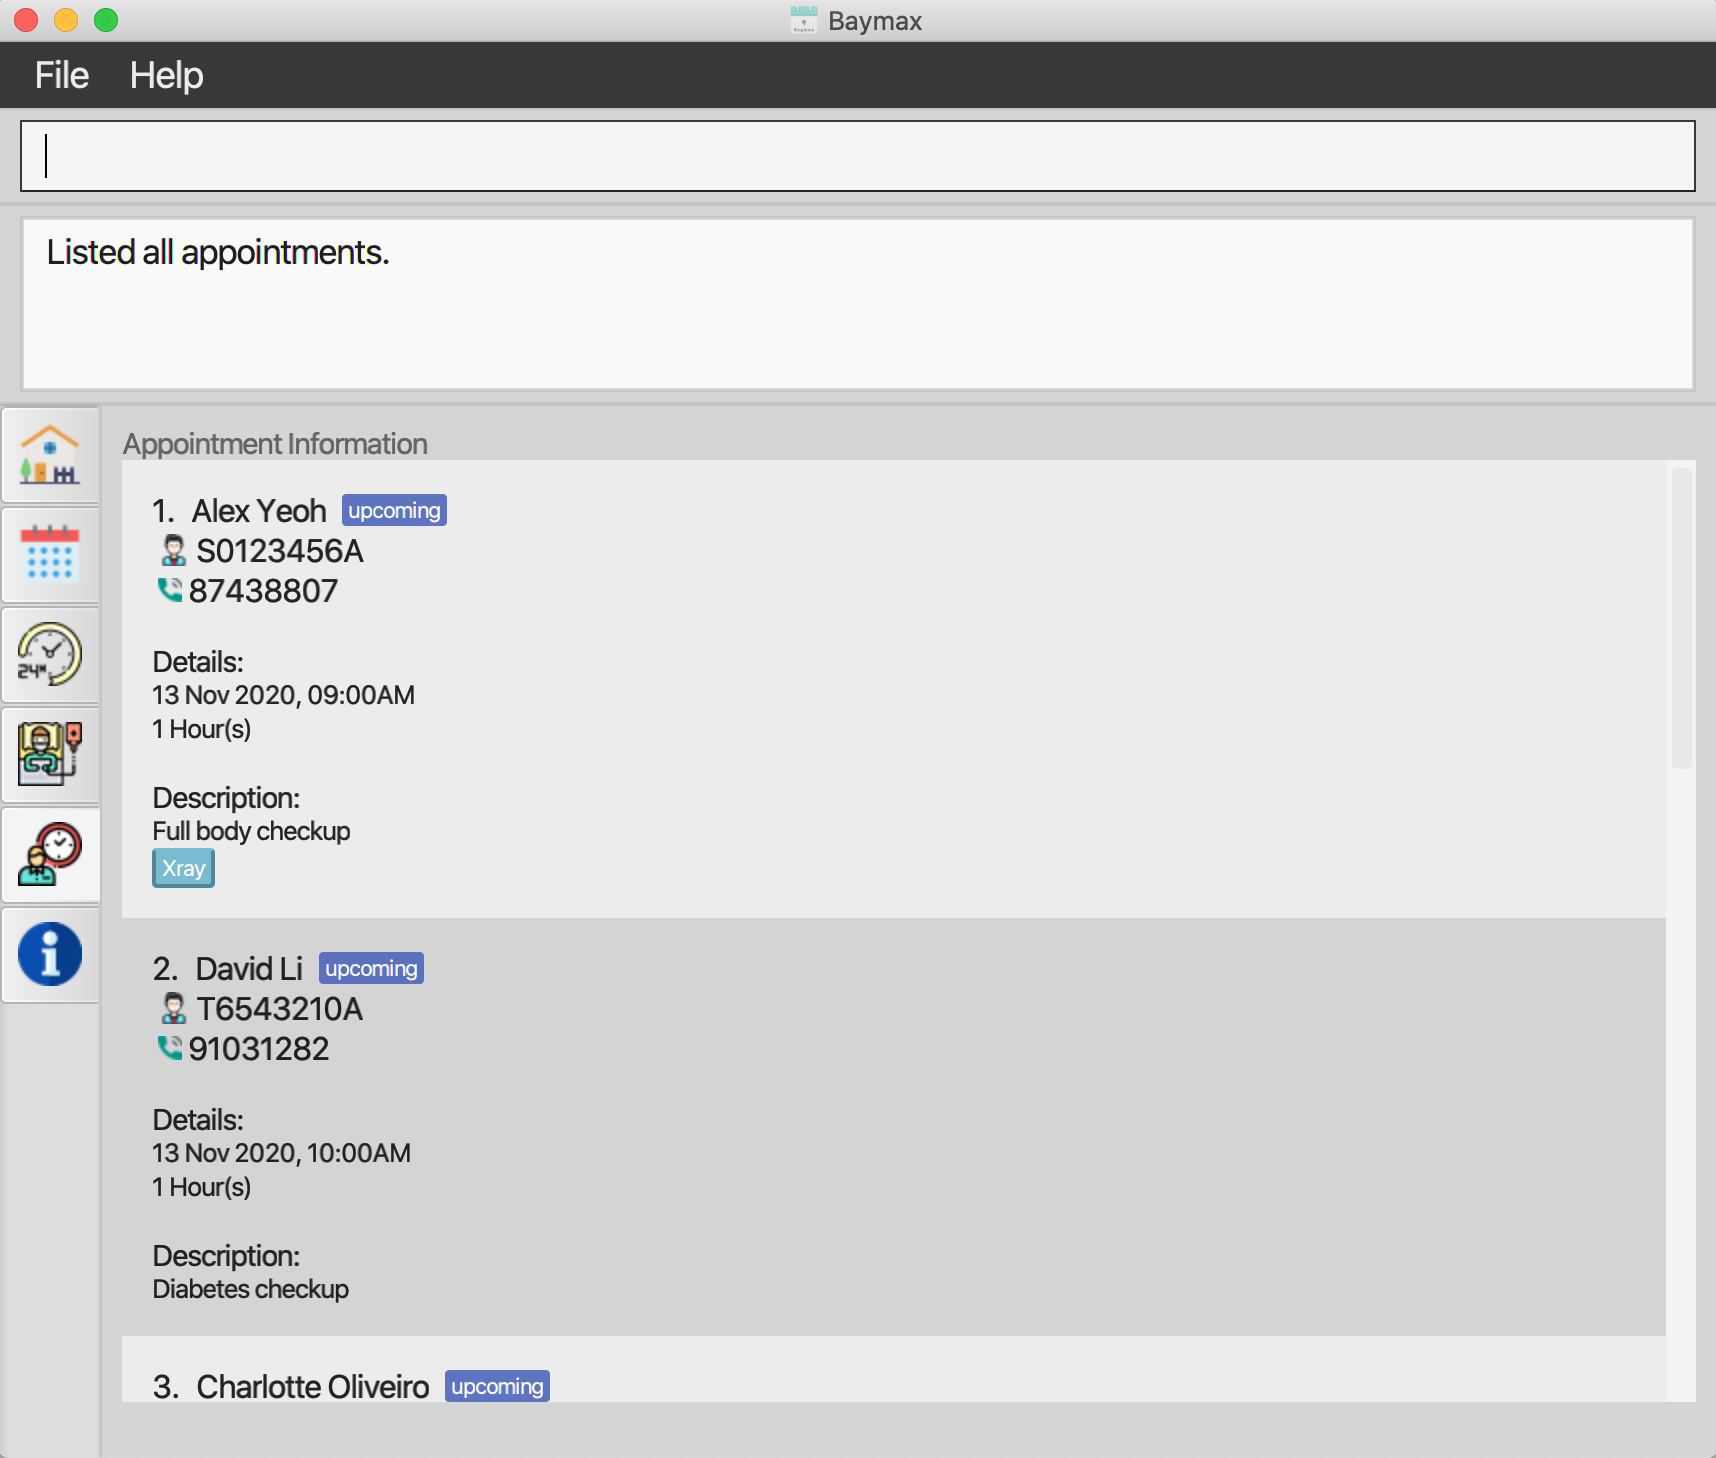
Figure 3b. Baymax Graphical User InterfaceTip: Typing
helpand pressing Enter will open up the help tab, which allows you to learn more commands. -
Refer to the Features below for details of each command.
4. Navigation Between Tabs
(Contributed by Jianhan and Thuta)
You can use these commands to switch between tabs by specifying the tab name.
Format:
TAB_NAME
Inputs:
| Input | Description |
|---|---|
| TAB_NAME | The name of the tab you want to switch to. |
| TAB_NAME | Tab that Baymax will switch to |
|---|---|
| dashboard | Dashboard: default view, shows current date and time, and today’s appointments |
| calendar | Calendar: see Section 5.3 Calendar |
| schedule | Schedule: see Section 5.3.3 Display schedule of a particular day |
| patient | Patients: displays current list of patients |
| appt | Appointments: displays current list of appointments |
| help | Help / Additional Information: displays list of commands |
Example:
- Type
calendarinto the Command Box. - Press
Enteron your keyboard
Outcome:
-
The second tab, featuring the Calendar view, will be displayed as shown in the image below.
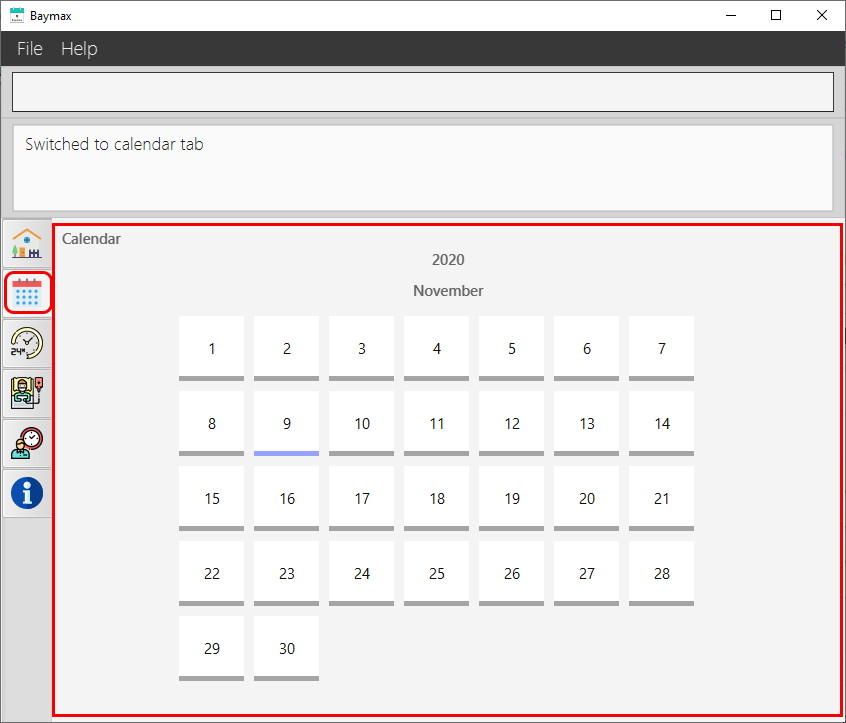
Figure 4a. Calendar Tab
5. Features
(Contributed by Thuta, Reuben and Kaitlyn)
Here you can find details on all of Baymax’s main features and how to use their associated commands. Each subsection will guide you with brief notes about the specific feature, as well as the command’s format, explanations of its inputs, an example and the expected outcome of running it.
5.1. Patient Information Management
This section contains all the features and commands you can use to manage patient information. These include:
- Add a new patient
- List all patients
- Edit a patient’s details
- Add or change a patient’s remark
- Find patients by name
- Delete a patient
5.1.1. Add a new patient: addpatient
You can use this command to add a new patient into the Baymax system.
Format:
addpatient nric/NRIC name/NAME phone/PHONE gender/GENDER [r/REMARK] [tag/TAG]
Inputs:
| Input | Description |
|---|---|
| NRIC | The nric of the patient. It must start with either ‘S’, ‘T’, ‘F’ or ‘G’ and end with an alphabet (both case-insensitive) and contain 7 numbers in between them. E.g. S1234567A, s1234567a |
| NAME | The name of the patient. It must only consist of alphabets and/or numbers (case-insensitive). E.g. Alice Tan, Alice1 |
| PHONE | The hand phone number that the patient wishes to be contacted by. It must be at least 3 digits long. It must only consist of numbers. E.g. 91234567 |
| GENDER | The gender of the patient. Females are indicated by the letter ‘F’ and males are indicated by the letter ‘M’ (both case-insensitive). E.g. M, m, F, f |
| REMARK | Any additional information about the patient. Alphabets, numbers, spaces, and special characters (like /*@#) are all allowed. A blank remark will remove any existing remarks. E.g. Only available on Mon / Tues |
| TAG | One-word tags for categorising and organising patients. A tag must only consist of alphabets and/or numbers and cannot contain spaces. A patient can have multiple tags. A blank tag will remove all existing tags. E.g. Diabetic, Asthmatic |
Example:
- Type
addpatient nric/S9772234F name/Jason Tan phone/98765432 gender/M tag/Asthmaticinto the Command Box. - Press
Enteron your keyboard.
Outcome:
If the command entered is valid:
- You will see a success message displayed in the Command Result Box as shown below.
-
The patient will be created and added to the system, and you will see the new patient displayed.
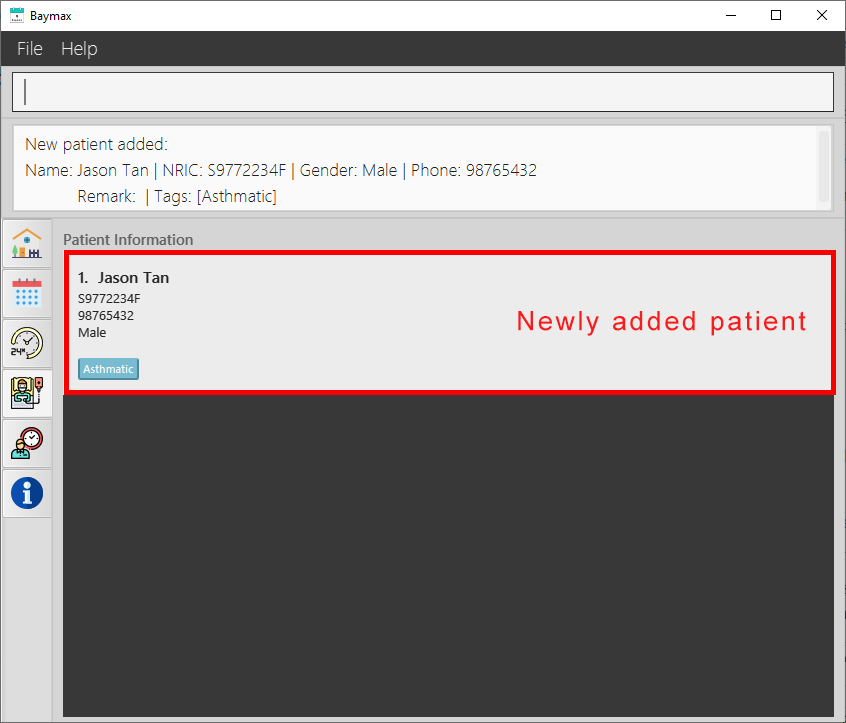
Figure 5.1.1a. Adding a patient - success
![]() Note:
Note:
When a patient is added successfully, the Main Display only shows the newly added patient. This makes it easier for you to verify that you have added the new patient correctly without having to search through the entire list.
If the command entered is invalid (e.g NRIC has 8 numbers in the middle instead of 7):
-
You will see an invalid command message in the Command Result Box, specifying which field was entered incorrectly.
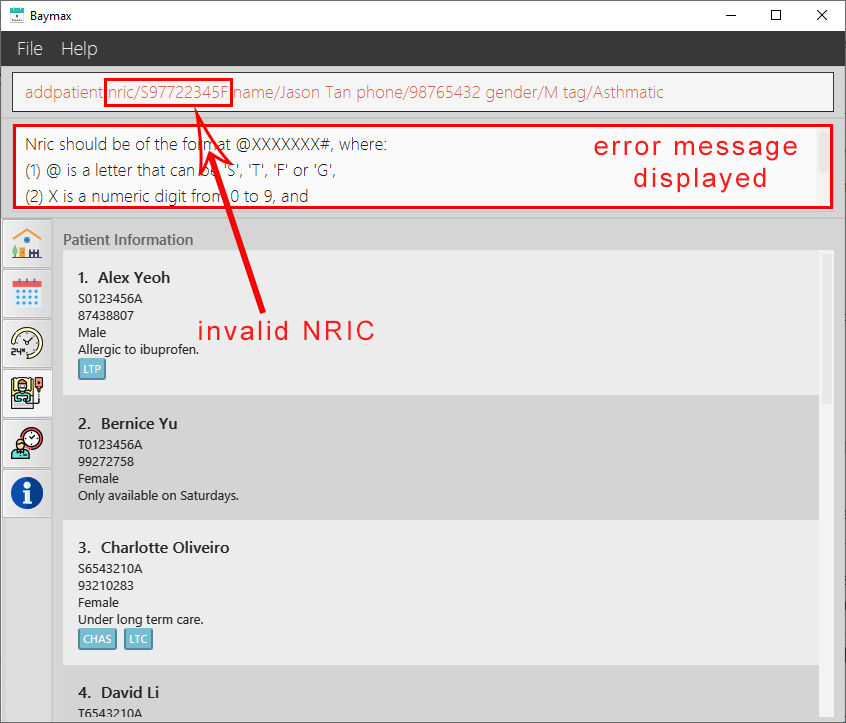
Figure 5.1.1b. Adding a patient - failure
5.1.2. List all patients: listpatients
You can use this command to list all the patients in the Baymax system. The Main Display will show a complete list of patients with all their information: name, nric, phone number, gender, remark, and tags.
Format:
listpatients
Example:
- Type
listpatientsinto the Command Box. - Press
Enteron your keyboard.
Outcome:
-
You will see a success message in the Command Result Box, and a list of all the patients in the system as shown below.
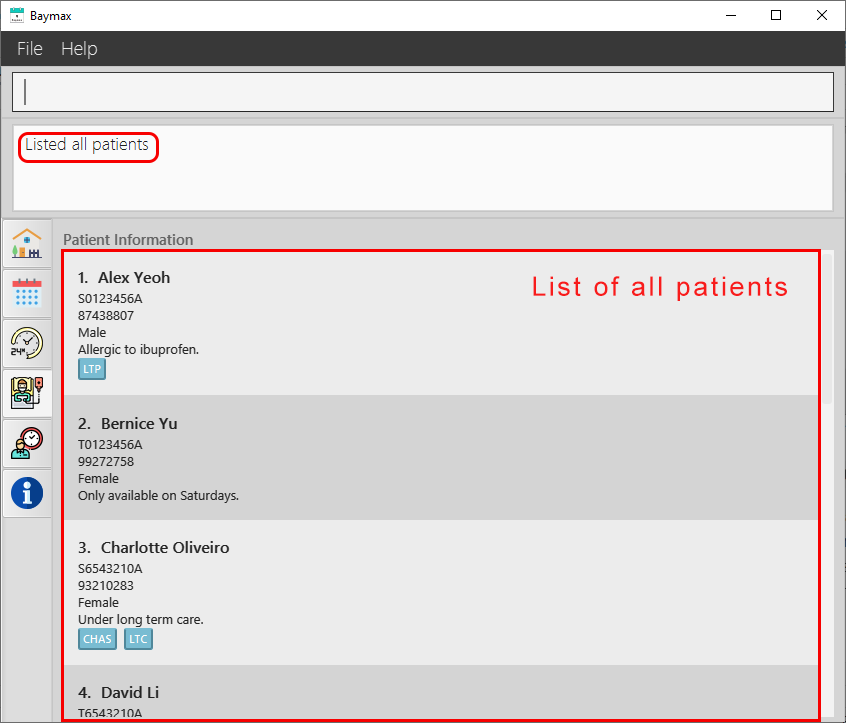
Figure 5.1.2a. Listing all patients
5.1.3. Edit a patient’s information: editpatient
You can use this command to edit any information of an existing patient. To specify the patient to edit, use the patient’s INDEX in the most recently displayed list (learn more about INDEX in the ‘Inputs’ table below).
Format:
editpatient INDEX <at least 1 patient information field>
Here are some examples of valid editpatient commands:
editpatient INDEX name/NAMEeditpatient INDEX nric/NRICeditpatient INDEX phone/PHONEeditpatient INDEX gender/GENDEReditpatient INDEX r/REMARKeditpatient INDEX tag/TAG- You can also supply multiple inputs in one command, e.g.
editpatient INDEX gender/GENDER name/NAME phone/PHONE - The input(s) supplied will directly replace the original one(s)
Inputs:
| Input | Description |
|---|---|
| INDEX | The number shown beside the patient’s name in the most recently displayed patient list. It must be a positive number within the length of the list. See Section 2.2.3 Command Format for more details. |
| NRIC | The nric of the patient. It must start with either ‘S’, ‘T’, ‘F’ or ‘G’ and end with an alphabet (both case-insensitive) and contain 7 numbers in between them. E.g. S1234567A, s1234567a |
| NAME | The name of the patient. It must only consist of alphabets and/or numbers (case-insensitive). E.g. Alice Tan, Alice1 |
| PHONE | The hand phone number that the patient wishes to be contacted by. It must be at least 3 digits long. It must only consist of numbers. E.g. 91234567 |
| GENDER | The gender of the patient. Females are indicated by the letter ‘F’ and males are indicated by the letter ‘M’ (both case-insensitive). E.g. M, m, F, f |
| REMARK | Any additional information about the patient. Alphabets, numbers, spaces, and special characters (like /*@#) are all allowed. A blank remark will remove any existing remarks. E.g. Only available on Mon / Tues |
| TAG | One-word tags for categorising and organising patients. A tag must only consist of alphabets and/or numbers and cannot contain spaces. A patient can have multiple tags. A blank tag will remove all existing tags. E.g. Diabetic, Asthmatic |
Example:
- Type
editpatient 2 tag/Asthmaticinto the Command Box. - Press
Enteron your keyboard.
Outcome:
If the command is valid:
- You will see a success message in the Command Result Box as shown below.
-
The tags of the patient at index 2 in the recent list will be edited, and you will see the newly edited patient displayed.
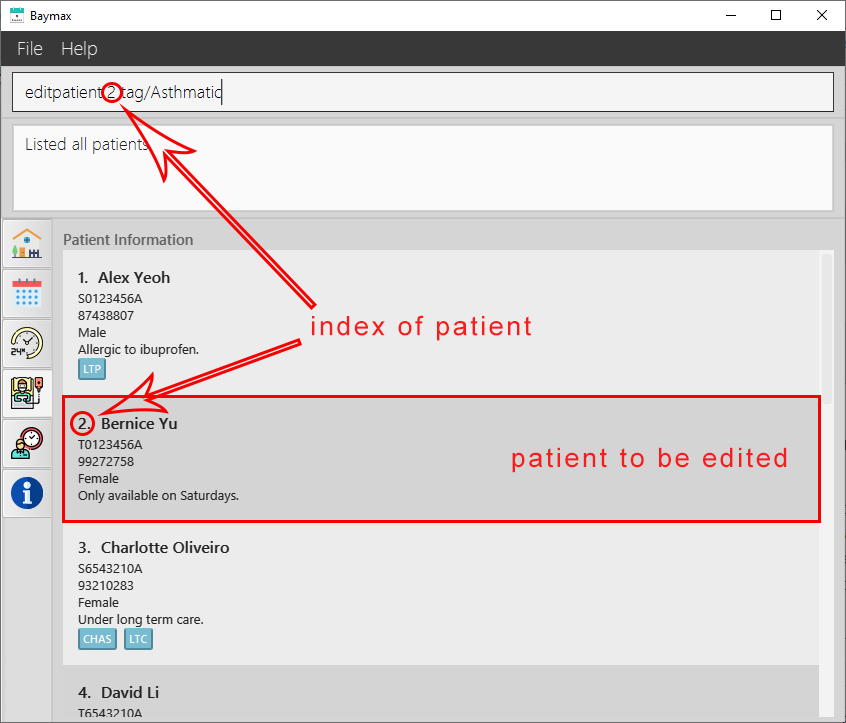
Figure 5.1.3a. Before editing a patient’s tag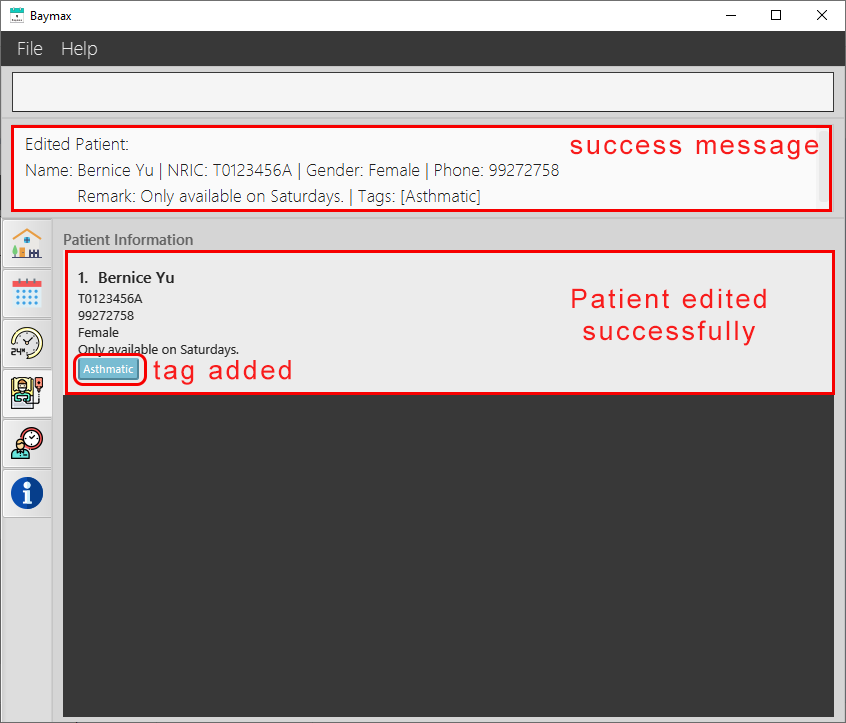
Figure 5.1.3b. Editing a patient’s information - success
If the field to be edited is absent (e.g. editpatient 3 is entered):
-
You will see an invalid command message in the Command Result Box, telling you to provide at least 1 field to edit.
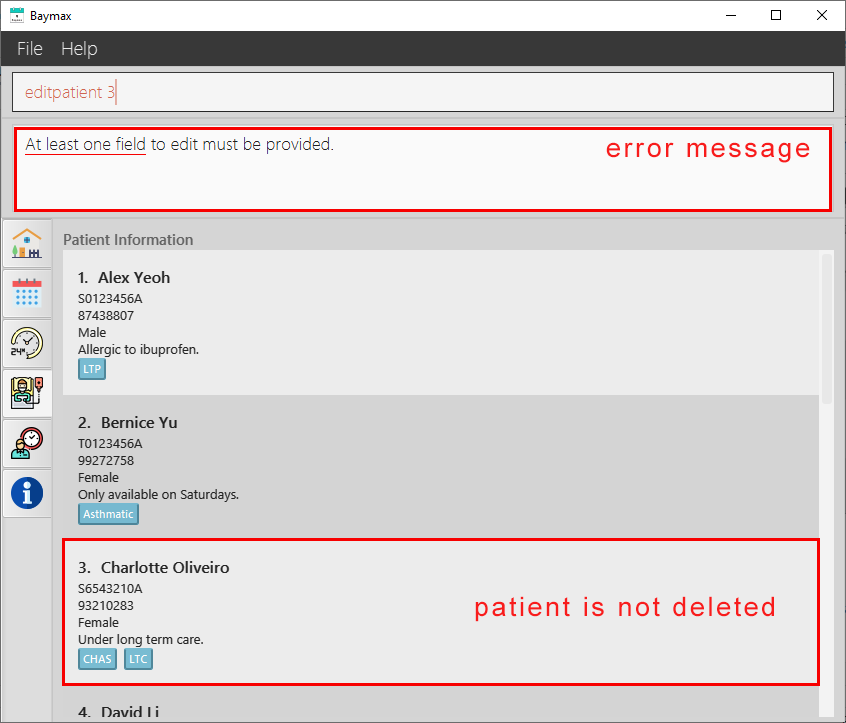
Figure 5.1.3c. Editing a patient’s information - failure
![]() Note:
Note:
-
When a patient is edited successfully, the Main Display only shows the recently edited patient. This makes it easier for you to verify that you have edited the patient’s details correctly without having to search through the entire list.
-
You can clear all existing tags of a patient by entering
editpatient INDEX tag/
5.1.4. Add a remark to a patient: remark
You can use this command to add or replace a patient’s remark using their INDEX in the most recently displayed list (learn more about INDEX in the ‘Inputs’ table below).
Format:
remark INDEX r/REMARK
Inputs:
| Input | Description |
|---|---|
| INDEX | The number shown beside the patient’s name in the most recently displayed patient list. It must be a positive number within the length of the list. See Section 2.2.3 Command Format for more details. |
| REMARK | Any additional information about the patient. Alphabets, numbers, spaces, and special characters (like /*@#) are all allowed. A blank remark will remove any existing remarks. E.g. Only available on Mon / Tues |
Example:
- Type
remark 6 r/Allergic to penicillininto the Command Box. - Press
Enteron your keyboard.
Outcome:
If the INDEX entered is valid:
-
You will see a success message in the Command Result Box as shown below.
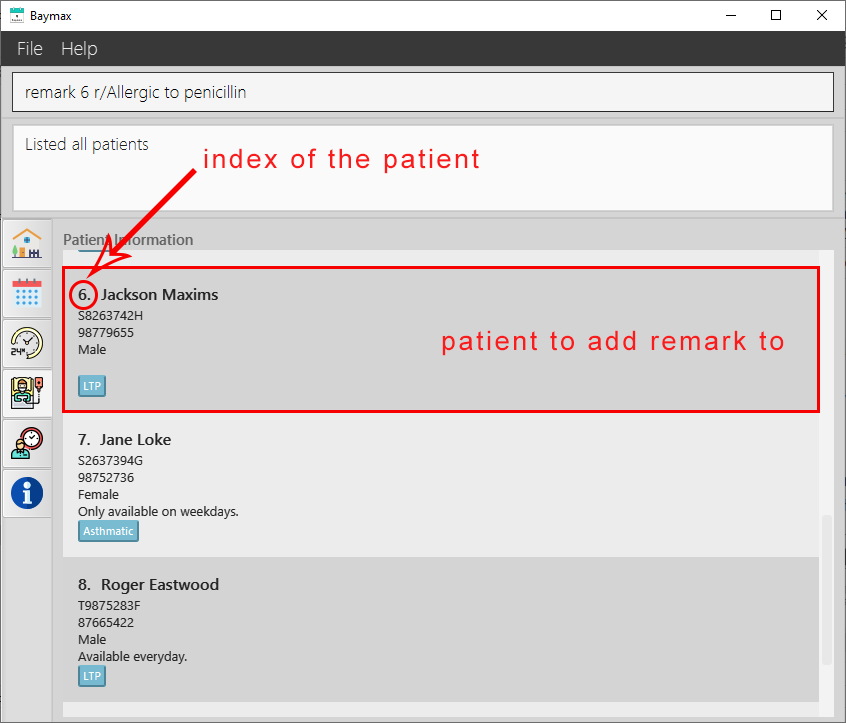
Figure 5.1.4a. Before adding a remark to a patient.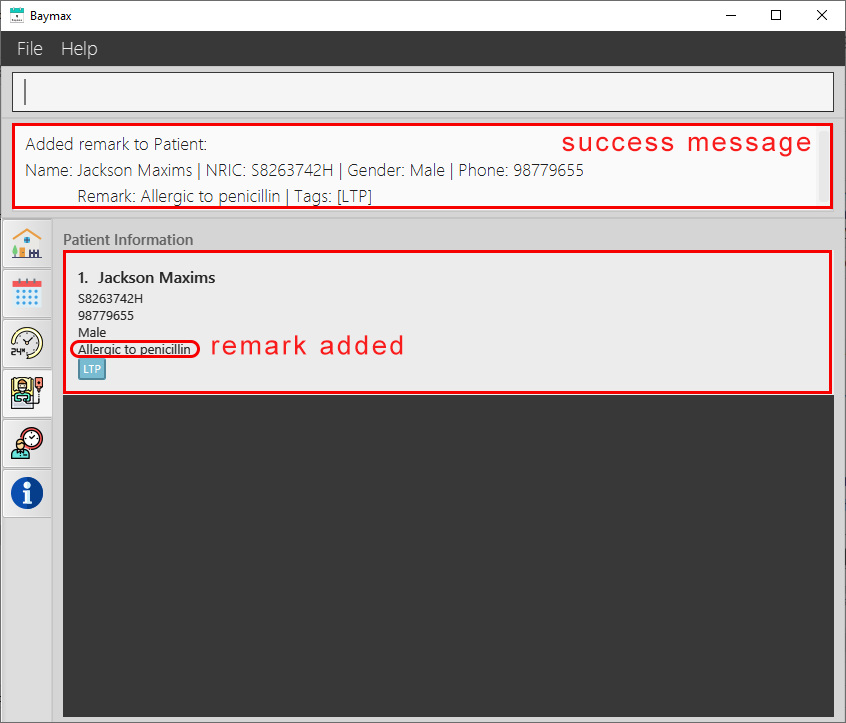
Figure 5.1.4b. Adding a remark to a patient - success
If the INDEX entered is invalid (E.g. remark 11 is entered, but there are only 9 patients):
-
You will see an invalid index message as shown below.
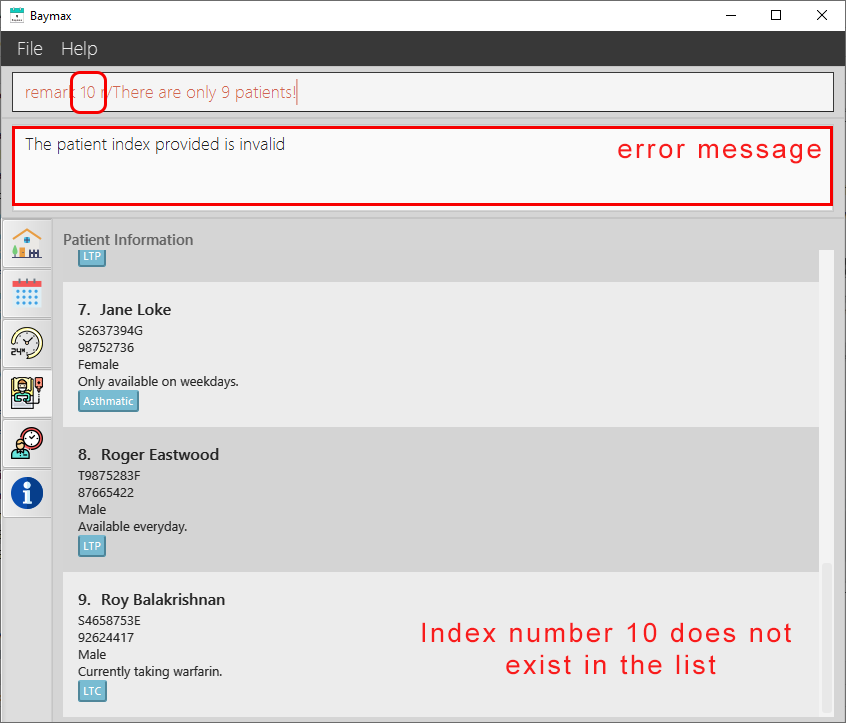
Figure 5.1.4c. Adding a remark to a patient - failure
![]() Note:
Note:
-
When a patient’s remark is added or replaced successfully, the Main Display only shows the patient with the edited remark. This makes it easier for you to verify that you have edited the patient’s remark correctly without having to search through the entire list.
-
Each patient can only have one remark. Using this command when a patient already has a remark will replace the existing remark with the new one entered.
-
Entering only
remark INDEXwill remove the current remark of the patient at thatINDEX.
5.1.5. Find patient by name: findpatient
You can use this command to find all patients whose name contains the keyword(s) entered. The keyword(s) can be just a part of the name you are searching for, and are case-insensitive.
Format:
findpatient NAME_KEYWORD
Inputs:
| Input | Description |
|---|---|
| NAME_KEYWORD | The name(s) or keyword(s) by which to search for patients. It can be an incomplete part of a patient’s name. E.g. Al Tan will match with ‘Alice Goh’, ‘Alex Yeoh’, and ‘Marcus Tan’ |
Example:
- Type
findpatient Alexinto the Command Box. - Press
Enteron your keyboard.
Outcome:
-
You will see a list of all patients with names that contain the keyword ‘Alex’.

Figure 5.1.5a. Finding a patient by name - success -
If there are no patients with a matching name, then none will be displayed as shown below.
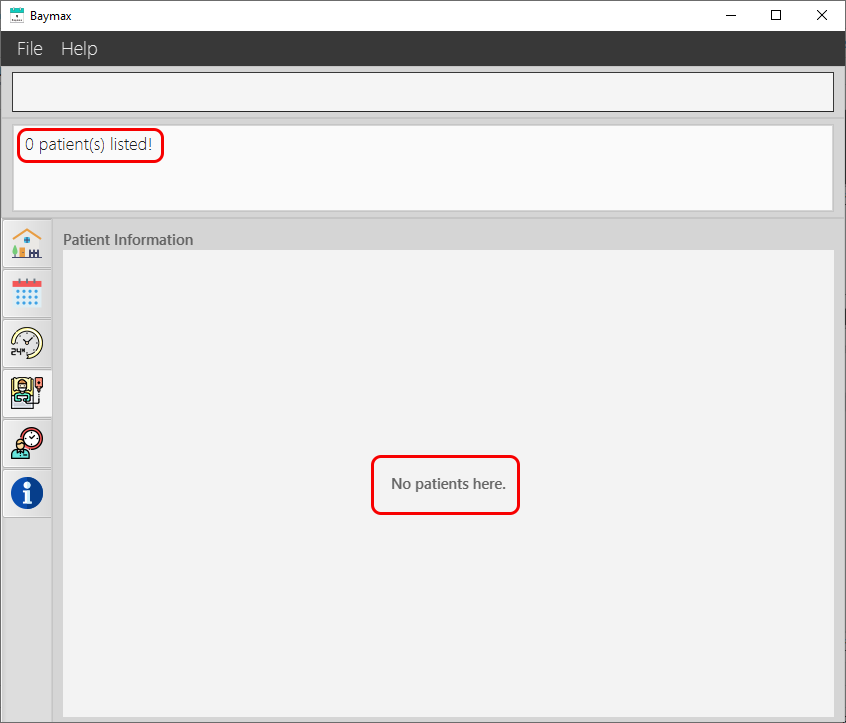
Figure 5.1.5b. Finding a patient by name - failure
5.1.6. Delete a patient: deletepatient
You can use this command to delete a patient using their INDEX in the most recently displayed list (learn more about INDEX in the ‘Inputs’ table below).
Warnings:
-
The current version of Baymax does not support undoing/redoing. Be careful when using the
deletepatientcommand as this action is irreversible. -
When you delete a patient, all the appointments associated with that patient will also be deleted.
Format:
deletepatient INDEX
Inputs:
| Input | Description |
|---|---|
| INDEX | The number shown beside the patient’s name in the most recently displayed patient list. It must be a positive number within the length of the list. See Section 2.2.3 Command Format for more details. |
Example:
- Type
deletepatient 8into the Command Box. - Press
Enteron your keyboard.
Outcome:
If the INDEX entered is valid:
- You will see a success message in the Command Result Box as shown below.
-
The patient at index 8 in the recent list will be deleted.
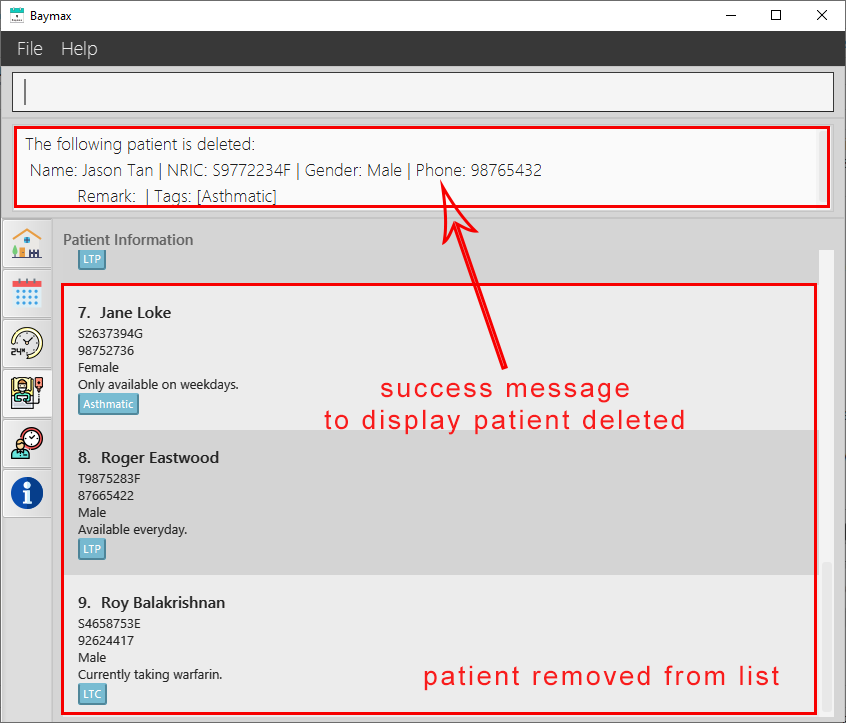
Figure 5.1.6a. Deleting a patient - success
If the INDEX entered is invalid (E.g deletepatient 11 is entered, but there are only 9 patients):
-
You will see an invalid index message as shown below.
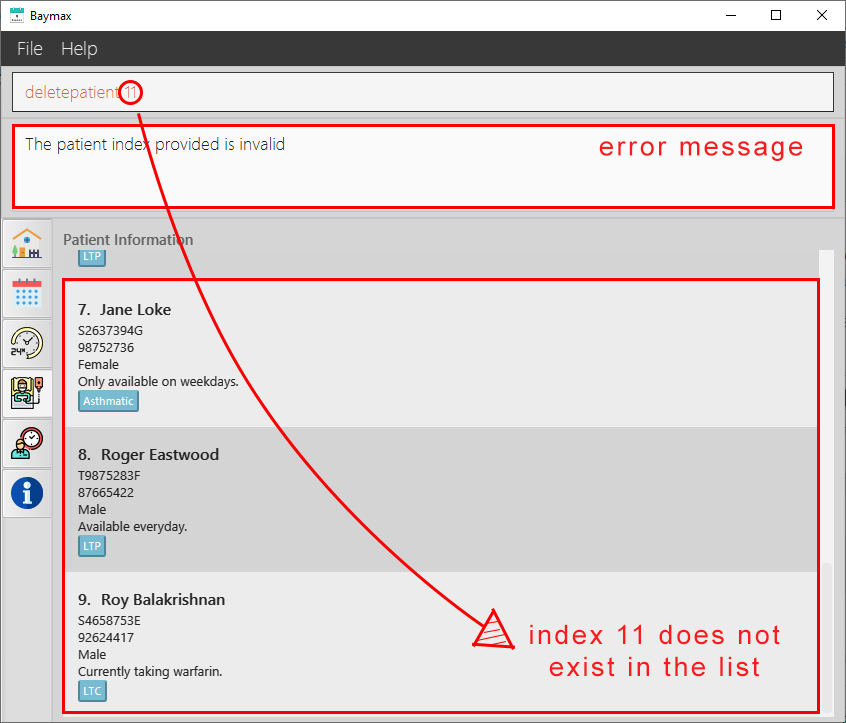
Figure 5.1.6b. Deleting a patient - failure
5.2. Appointment Information Management
This section contains all the features and commands you can use to manage appointment information. These include:
- Add a new appointment
- List all appointments
- List all appointments of a patient
- Edit an appointment’s details
- Mark an appointment as done
- Mark an appointment as missed
- Find an appointment by keyword
- Cancel an appointment
5.2.1. Add a new appointment: addappt
You can use this command to add a new appointment for an existing patient. To specify the patient, use either their INDEX in the most recently displayed patient list, or their NRIC. To specify the date-time of the appointment, you can supply either the full DATETIME using on/, or only the TIME using at/ (learn more about this in the ‘Inputs’ table below).
Format:
addappt INDEX on/DATETIME dur/DURATION desc/DESCRIPTION [tag/TAG]
addappt INDEX at/TIME dur/DURATION desc/DESCRIPTION [tag/TAG]
addappt nric/NRIC on/DATETIME dur/DURATION desc/DESCRIPTION [tag/TAG]
addappt nric/NRIC at/TIME dur/DURATION desc/DESCRIPTION [tag/TAG]
Inputs:
| Input | Description |
|---|---|
| INDEX | The number shown beside the patient’s name in the most recently displayed patient list. It must be a positive number within the length of the list. See Section 2.2.3 Command Format for more details. |
| NRIC | The nric of the patient. It must start with either ‘S’, ‘T’, ‘F’ or ‘G’ and end with an alphabet (both case-insensitive) and contain 7 numbers in between them. E.g. S1234567A, s1234567a |
| DATETIME | The date followed by the time of the appointment. It must be in DD-MM-YYYY HH:MM format. E.g. 20-01-2020 15:00 |
| TIME | The time of the appointment. It must be in HH:MM format following the 24-hour system. E.g. 15:00. The date will be inferred from the date set in the calendar (see Section 5.3 Calendar. |
| DURATION | The duration of the appointment in minutes. It must be a positive whole number, and the appointment must not extend to the next day. E.g. 60 |
| DESCRIPTION | The description of the appointment. Alphabets, numbers, spaces, and special characters (like /*@#) are all allowed. E.g. Wrist fracture check-up #3 |
| TAG | One-word tags for categorising and organising appointments. A tag must only consist of alphabets and/or numbers and cannot contain spaces. An appointment can have multiple tags. A blank tag will remove all existing tags. E.g. Xray, MRI |
Example:
- Type
addappt 1 on/11-11-2020 12:30 dur/60 desc/Removal of braces. tag/Dentalinto the Command Box. - Press
Enteron your keyboard.
Outcome:
If the command entered is valid:
-
You will see a success message in the Command Result Box as shown below.
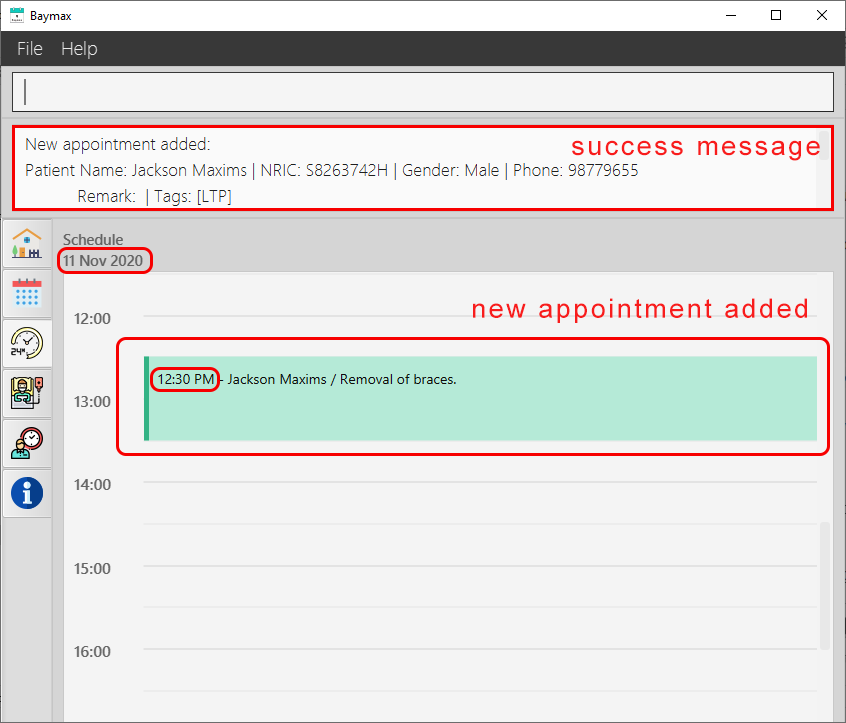
Figure 5.2.1a. Scheduling a new appointment for a patient
If the command entered is invalid (e.g. DATETIME supplied is of the wrong format):
- You will see an invalid command message in the Command Result Box, specifying which field was entered incorrectly.
![]() Note:
Note:
- Either
INDEXorNRICshould be provided. If both are provided, theINDEXwill be taken. - Either
DATETIMEorTIMEshould be provided. If both are provided, theDATETIMEwill be taken. - For your convenience, newly added appointments with
DATETIMEbefore the current date and time will be automatically marked asdone, i.e. these are taken as backdated appointments that have already occurred.
5.2.2. List all appointments: listappts
You can use this command to list all the appointments in the Baymax system, which belong to any patient. The Main Display will show a complete list of appointments with all their information: patient it belongs to, date and time, duration, description and tags.
Format:
listappts
Example:
- Type
listapptsinto the Command Box. - Press
Enteron your keyboard.
Outcome:
-
You will see a success message in the Command Result Box, and a list of all the appointments in the system as shown below.
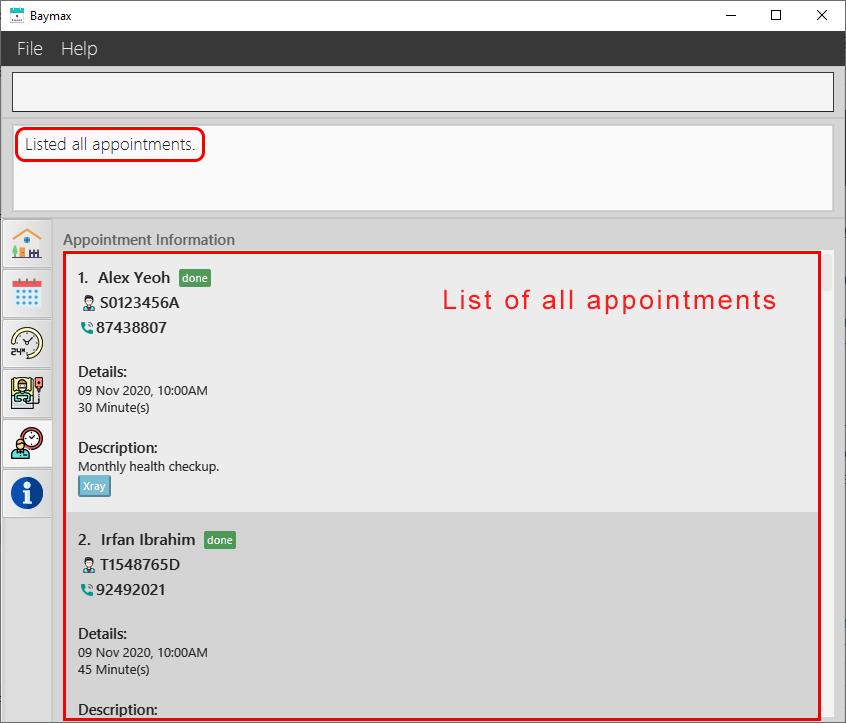
Figure 5.2.2a. Listing all appointments
5.2.3. List all appointments of a patient: listapptsof
You can use this command to list all the appointments belonging to a certain patient. To specify the patient, use either their INDEX in the most recently displayed patient list, their NRIC, or their full NAME (learn more about this in the ‘Inputs’ table below).
![]() Note:
Note:
One tip for this command is to first find patients by name using the findpatient command. Then, execute listapptsof with the patient’s INDEX in the newly obtained list to get all appointments of that patient.
Format:
listapptsof INDEX
listapptsof nric/NRIC
listapptsof name/NAME
Inputs:
| Input | Description |
|---|---|
| INDEX | The number shown beside the patient’s name in the most recently displayed patient list. It must be a positive number within the length of the list. See Section 2.2.3 Command Format for more details. |
| NRIC | The nric of the patient. It must start with either ‘S’, ‘T’, ‘F’ or ‘G’ and end with an alphabet (both case-insensitive) and contain 7 numbers in between them. E.g. S1234567A, s1234567a |
| NAME | The name by which to search for the patient. It must be the exact full name of the patient. |
Example:
- Type
listapptsof 1into the Command Box. - Press
Enteron your keyboard.
Outcome:
If the command entered is valid:
-
You will see a list of all appointments associated with the patient as shown below.
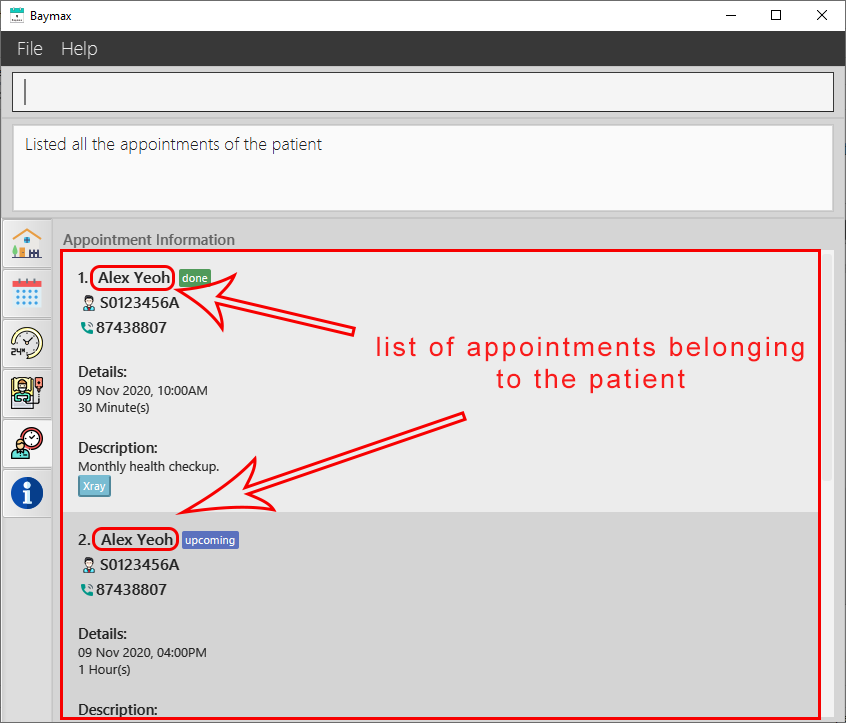
Figure 5.2.3a. Listing the appointments of a patient
5.2.4. Edit an appointment: editappt
You can use this command to edit any information of an existing appointment. To specify the appointment to edit, use the appointment’s INDEX in the most recently displayed appointment list (learn more about INDEX in the ‘Inputs’ table below).
Format:
editappt INDEX <at least 1 appointment information field>
Here are some examples of valid editappt commands:
editappt INDEX on/DATETIMEeditappt INDEX dur/DURATIONeditappt INDEX desc/DESCeditappt INDEX tag/TAG- You can also supply multiple inputs in one command, e.g.
editappt INDEX on/DATETIME tag/TAG desc/DESC - The input(s) supplied will directly replace the original one(s)
Inputs:
| Input | Description |
|---|---|
| INDEX | The number shown beside the appointment in the most recently displayed appointment list. It must be a positive number within the length of the list. See Section 2.2.3 Command Format for more details. |
| DATETIME | The date followed by the time of the appointment. It must be in DD-MM-YYYY HH:MM format. E.g. 20-01-2020 15:00 |
| DURATION | The duration of the appointment in minutes. It must be a positive whole number, and the appointment must not extend to the next day. E.g. 60 |
| DESCRIPTION | The description of the appointment. Alphabets, numbers, spaces, and special characters (like /*@#) are all allowed. E.g. Wrist fracture check-up #3 |
| TAG | One-word tags for categorising and organising appointments. A tag must only consist of alphabets and/or numbers and cannot contain spaces. An appointment can have multiple tags. A blank tag will remove all existing tags. E.g. Xray, MRI |
Example:
- Type
editappt 10 on/12-11-2020 12:00into the Command Box. - Press
Enteron your keyboard.
Outcome:
If the command is valid:
- You will see a success message in the Command Result Box as shown below.
-
The
DATETIMEof the appointment at index 10 in the recent list will be edited.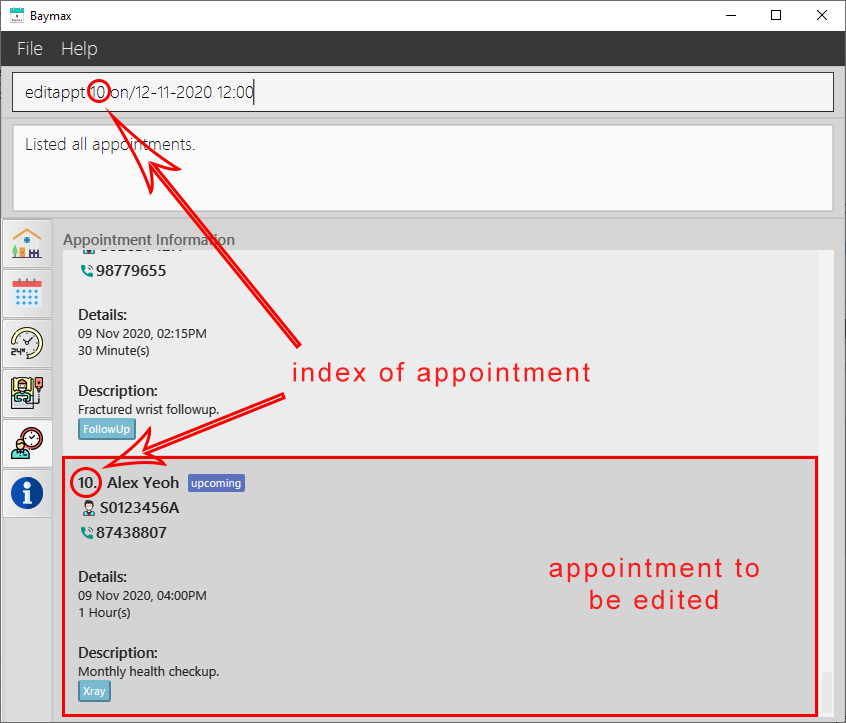
Figure 5.2.4a. Before editing an appointment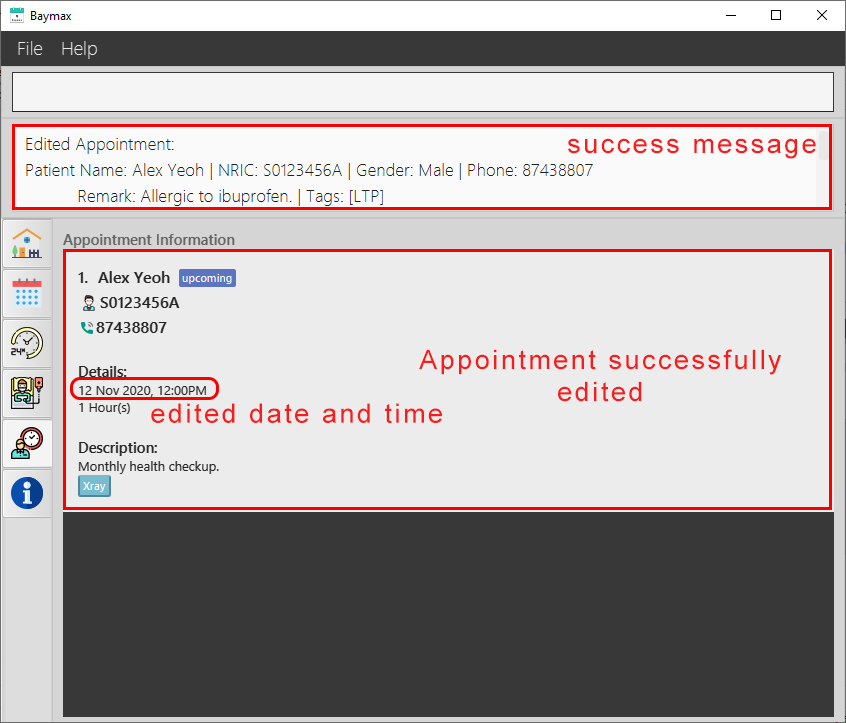
Figure 5.2.4b. After editing an appointment
![]() Note:
Note:
When an appointment is edited successfully, the Main Display only shows the recently edited appointment. This makes it easier for you to verify that you have edited the appointment’s details correctly without having to search through the entire list.
5.2.5. Mark an appointment as done: done
You can use this command to mark an existing appointment as done. To specify the appointment, use either its INDEX in the most recently displayed appointment list, or its DATETIME with the full NAME of the patient it belongs to.
Notes:
- Baymax automatically marks appointments as done once they are past the current date and time.
- You cannot mark any upcoming appointments as done.
Format:
done INDEX
done on/DATETIME name/NAME
Inputs:
| Input | Description |
|---|---|
| INDEX | The number shown beside the appointment in the most recently displayed appointment list. It must be a positive number within the length of the list. See Section 2.2.3 Command Format for more details. |
| DATETIME | The date followed by the time of the appointment. It must be in DD-MM-YYYY HH:MM format. E.g. 20-01-2020 15:00 |
| NAME | The name by which to search for the patient. It must be the exact full name of the patient. |
Example:
- Type
done 7into the Command Box. - Press
Enteron your keyboard.
Outcome:
If the command entered is valid:
- You will see a success message in the Command Result Box as shown below.
-
The appointment at index 7 in the recent list will be marked as done.
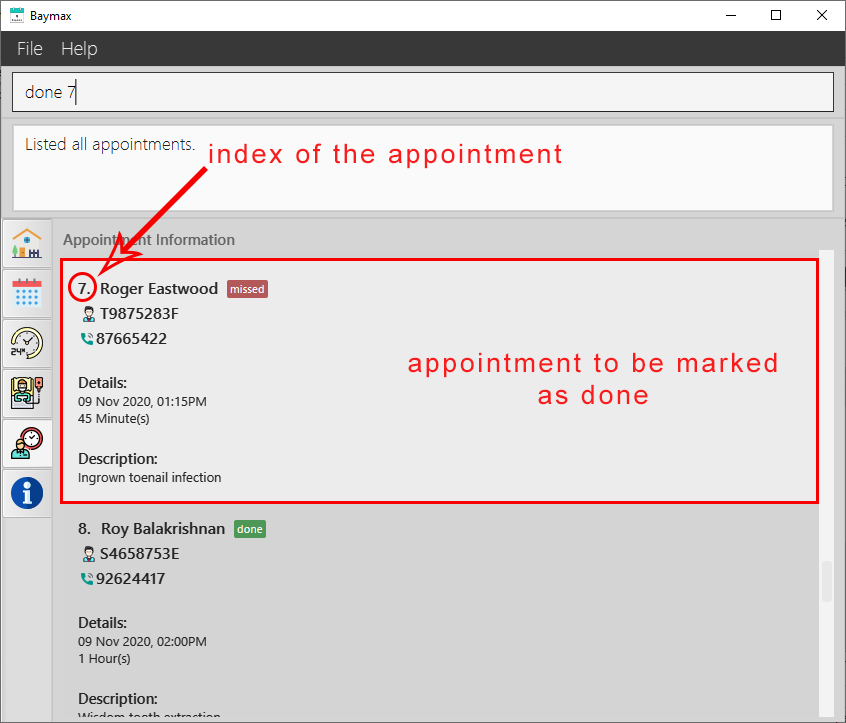
Figure 5.2.5a. Before marking an appointment as done
Figure 5.2.5b. Marking an appointment as done
![]() Note:
Note:
When an appointment is marked as done successfully, the Main Display only shows that appointment. This makes it easier for you to verify that the appointment is marked as done without having to search through the entire list.
5.2.6. Mark an appointment as missed: missed
You can use this command to mark an existing appointment as missed. To specify the appointment, use either its INDEX in the most recently displayed appointment list, or its DATETIME with the full NAME of the patient it belongs to.
Format:
missed INDEX
missed on/DATETIME name/NAME
Inputs:
| Input | Description |
|---|---|
| INDEX | The number shown beside the appointment in the most recently displayed appointment list. It must be a positive number within the length of the list. See Section 2.2.3 Command Format for more details. |
| DATETIME | The date followed by the time of the appointment. It must be in DD-MM-YYYY HH:MM format. E.g. 20-01-2020 15:00 |
| NAME | The name by which to search for the patient. It must be the exact full name of the patient. |
Example:
- Type
missed 7into the Command Box. - Press
Enteron your keyboard.
Outcome:
If the command entered is valid:
- You will see a success message in the Command Result Box as shown below.
-
The appointment at index 7 in the recent list will be marked as missed.
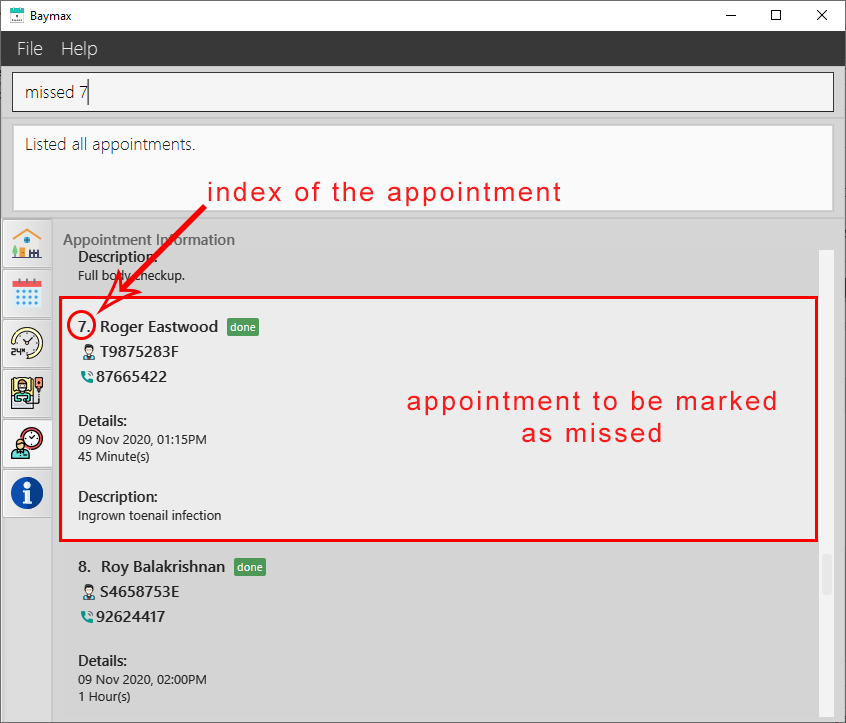
Figure 5.2.6a. Before marking an appointment as missed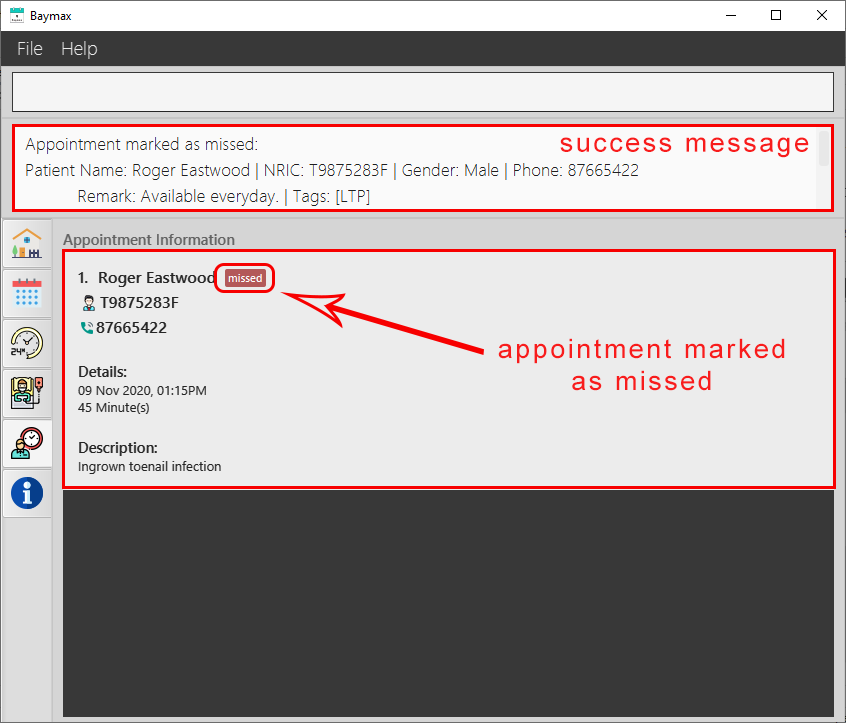
Figure 5.2.6b. Marking an appointment as missed
![]() Note:
Note:
When an appointment is marked as missed successfully, the Main Display only shows that appointment so that you do not need to scroll through the appointment list to ensure that the appointment is marked as missed.
5.2.7. Find appointment by keyword: findappt
You can use this command to find all appointments whose description or tags contain the keyword(s) entered. The keyword(s) can be just a part of the description or tag you are searching for, and are case-insensitive.
Format:
findappt KEYWORD
Inputs:
| Input | Description |
|---|---|
| KEYWORD | The keyword(s) by which to search for appointments. It can be an incomplete part of an appointment’s description or tag. E.g. Remov will match with the description ‘Remove braces’ and the tag ‘Removal’ |
Example:
- Type
findappt checkinto the Command Box. - Press
Enteron your keyboard.
Outcome:
You will see a list of all appointments with description or tags that contain the keyword ‘check’.
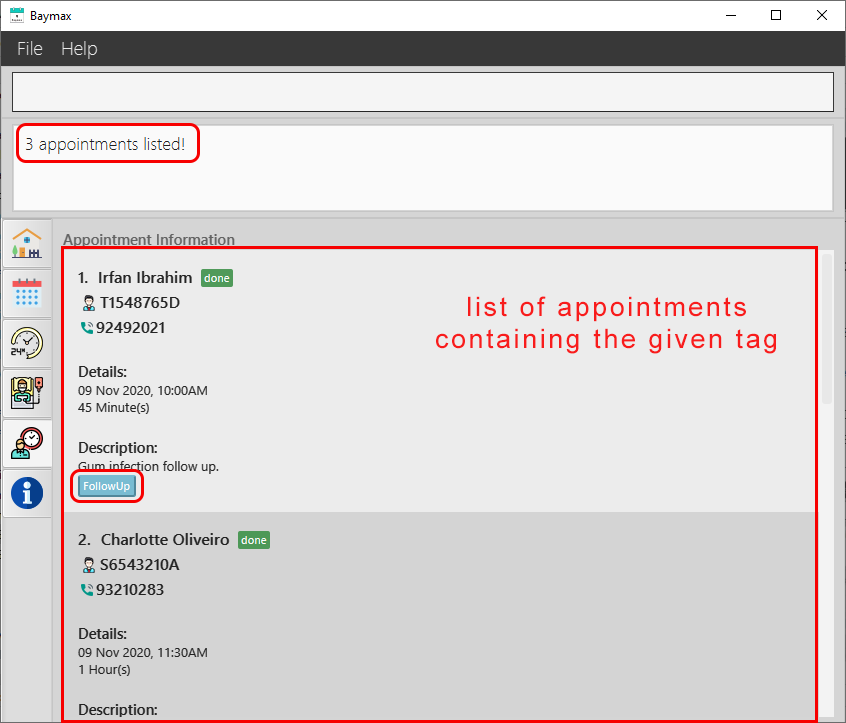
Figure 5.2.7a. Finding an appointment by tag
5.2.8. Cancel an appointment: cancel
You can use this command to cancel an existing appointment. To specify the appointment, use either its INDEX in the most recently displayed appointment list, or its DATETIME with the full NAME of the patient it belongs to.
Format:
cancel INDEX
cancel on/DATETIME name/NAME
Inputs:
| Input | Description |
|---|---|
| INDEX | The number shown beside the appointment in the most recently displayed appointment list. This is also the list shown in the Appointments Tab and/or the current Main Display. Hence, the index of an appointment can change after running certain commands. It must be a positive number. |
| DATETIME | The date followed by the time of the appointment. It must be in DD-MM-YYYY HH:MM format. E.g. 20-01-2020 15:00 |
| NAME | The name by which to search for the patient. It must be the exact full name of the patient. |
Example:
- Type
cancel 1into the Command Box. - Press
Enteron your keyboard.
Outcome:
If the command entered is valid:
- You will see a success message in the Command Result Box as shown below.
-
The appointment at index 1 in the recent list will be removed.
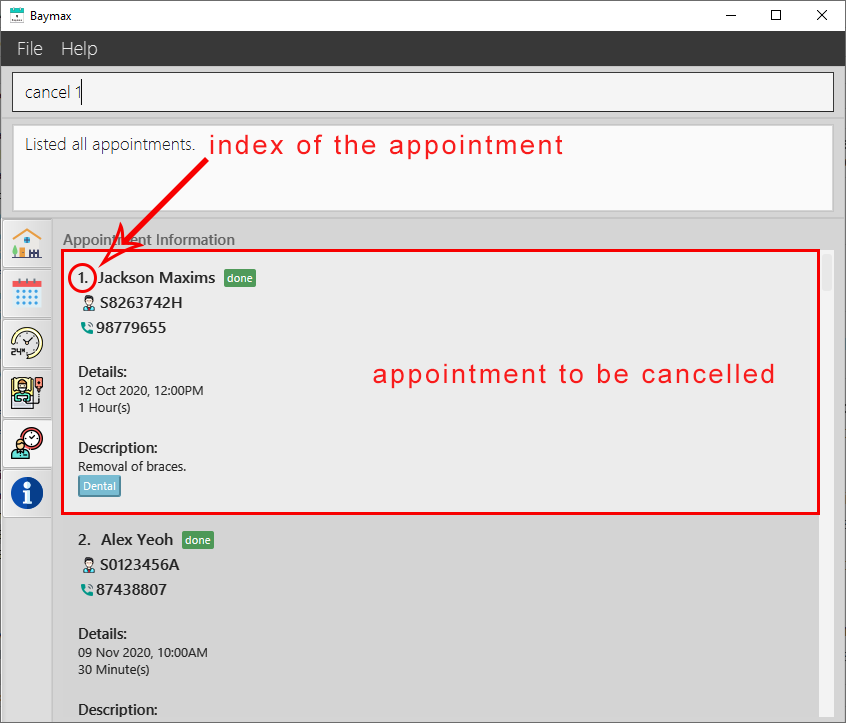
Figure 5.2.8a. Before cancelling an appointment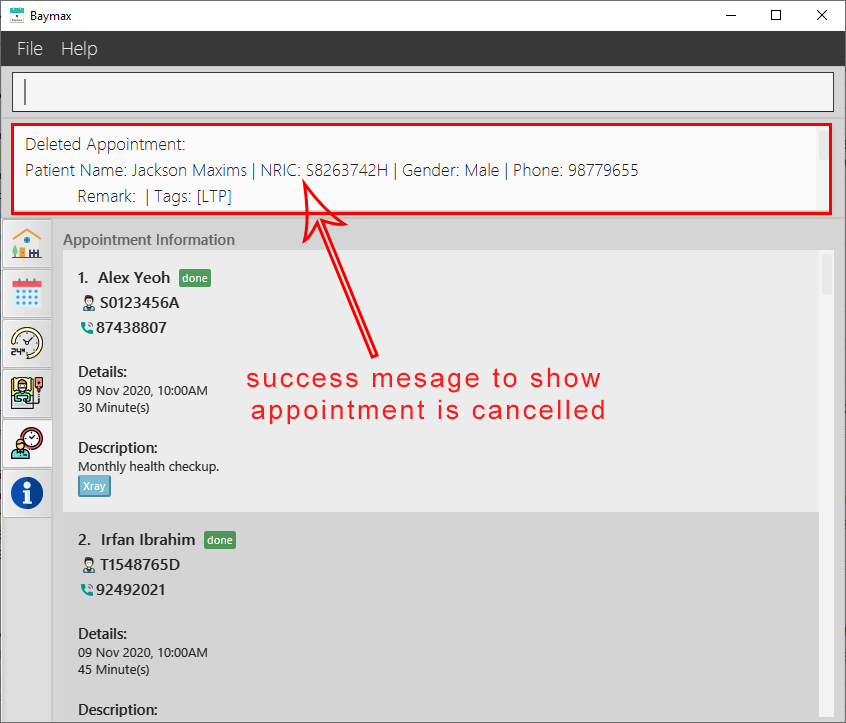
Figure 5.2.8b. After cancelling an appointment
![]() Warning:
Warning:
The current version of Baymax does not support undoing/redoing. Be careful when using the cancel command as this action removes the appointment from the system permanently and is irreversible.
5.3. Calendar
Baymax Calendar allows you to easily visualise the availability of all the days within a month, and to see the schedule of a particular day. When switching to the Calendar Tab, Baymax will display the current month and year by default, until you specify something else.
The following subsections will guide you through how to use the Calendar.
![]() Note:
Note:
The dates in the calendar view are not clickable.
5.3.1. Switch to a particular year: year
You can use this command to switch to a particular year and view the appointments in a calendar format.
Format:
year YEAR
Inputs:
| Input | Description |
|---|---|
| YEAR | The year you want to switch Calendar to. It must be a 4-digit positive number from 1900 to 2100 (inclusive). E.g. 2020 |
Example:
- Type
year 2019into the Command Box. - Press enter on your keyboard.
Outcome:
-
You will see the Calendar Tab displayed, with a view of the currently selected month in the year 2019.
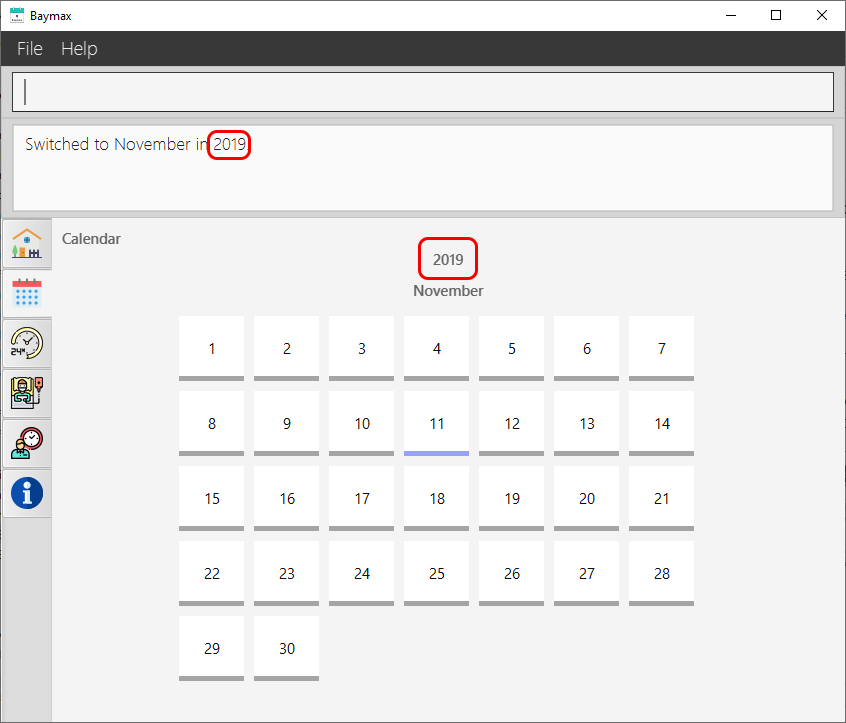
Figure 5.3.1a. Switching the year to 2019
5.3.2. Switch to a particular month: month
You can use this command to switch to a particular month and view the appointments in a calendar format.
Format:
month MONTH
Inputs:
| Input | Description |
|---|---|
| MONTH | The month you want to switch Calendar to. It must be a positive number from 1 to 12, or the name of the month, either in full or as its first 3 letters (case-insensitive). E.g. 1, January, Jan |
Example:
- Type
year 2019into the Command Box and press Enter to switch to the year 2019. - Type
month 9ormonth septemberormonth sepinto the Command Box. - Press Enter on your keyboard.
Outcome:
-
You will see the Calendar Tab displayed, with a view of the month September in the currently selected year.
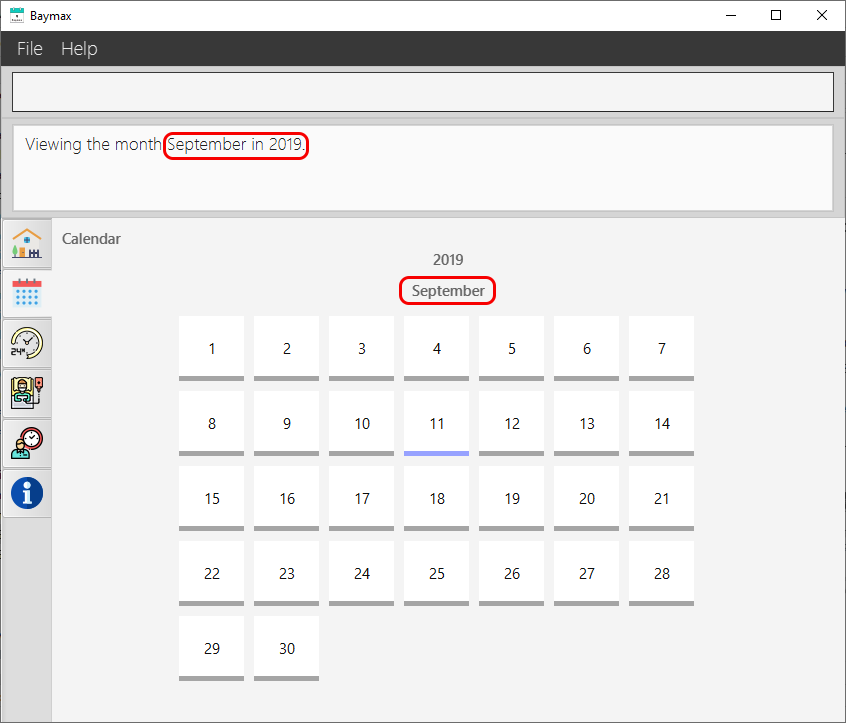
Figure 5.3.2a. Switching the month to September
5.3.3. Display schedule of a particular day: day
You can use this command to display the schedule of a particular day. This switches from the Calendar to the Schedule view of the day, displaying a timetable of appointments.
| Input | Description |
|---|---|
| DAY | The day of the month you want to switch to. It must be a positive number from 1 to the last day of the month (inclusive). E.g. if the month is January (which has 31 days), the range of numbers you can enter is 1 to 31. |
Format:
day DAY
Example:
- Type
year 2020into the Command Box and press Enter to switch to the year 2020. - Type
month 11into the Command Box and press Enter to switch to the month November. - Type
day 9into the Command Box. - Press Enter on your keyboard.
Outcome:
-
You will see the Schedule for the day 09-11-2020.
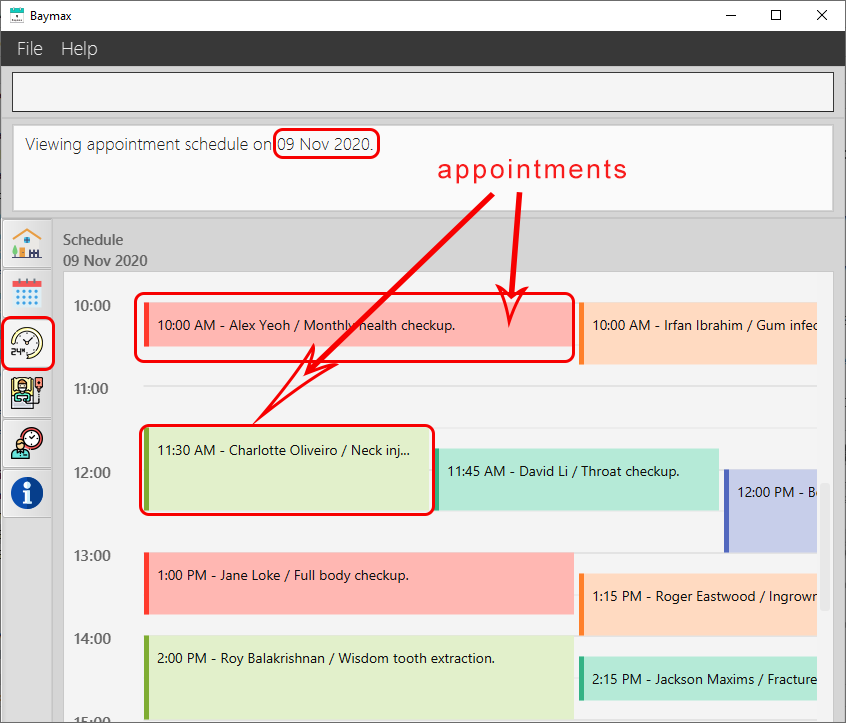
Figure 5.3.3a. Viewing the schedule for 9th November 2020
![]() Note:
Note:
For the addappt command, where the at/TIME field can be specified in place of the on/DATETIME field, the appointment will be set on the current selected date of the Calendar. E.g. if the schedule for 09-11-2020 was last displayed in Calendar, the command addappt 1 at/13:00 ... will set the date and time of the appointment as 9 November 2020, 1.00PM (even if you had run other Patient and Appointment commands after).
5.4. Utilities
These are some generic commands which will be useful to you along the way.
5.4.1. View help: help
You can use this command to see a quick summary of commands available in Baymax, or to get the URL link to the full User Guide (this document) for more details about the commands.
Format:
help
Example:
- Type
helpinto the Command Box. - Press
Enteron your keyboard.
Outcome:
-
You will see a link directing you to this User Guide, together with a summarised list of commands.
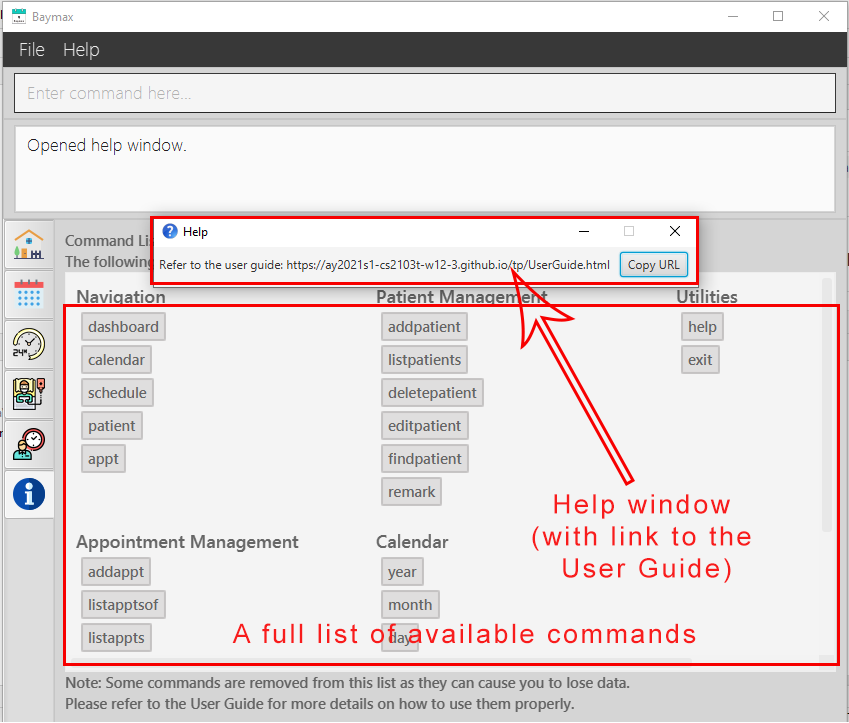
Figure 5.4.1a. Executinghelpcommand
5.4.2. Exit the program : exit
You can use this command to exit the program.
Format: exit
Example:
- Type
exitinto the Command Box. - Press
Enteron your keyboard.
Outcome:
- The application window will close, and Baymax will stop running.
5.4.3. Clear all data in Baymax: clear
You can use this command to remove all the patient and appointment information in Baymax.
![]() Warning:
Warning:
This is a command to be used with caution as it permanently removes all data in Baymax, and is irreversible.
Format: clear
Example:
- Type
clearinto the Command Box. - Press
Enteron your keyboard.
Outcome:
-
You will see that all patients and appointments in Baymax have been cleared, as shown below.
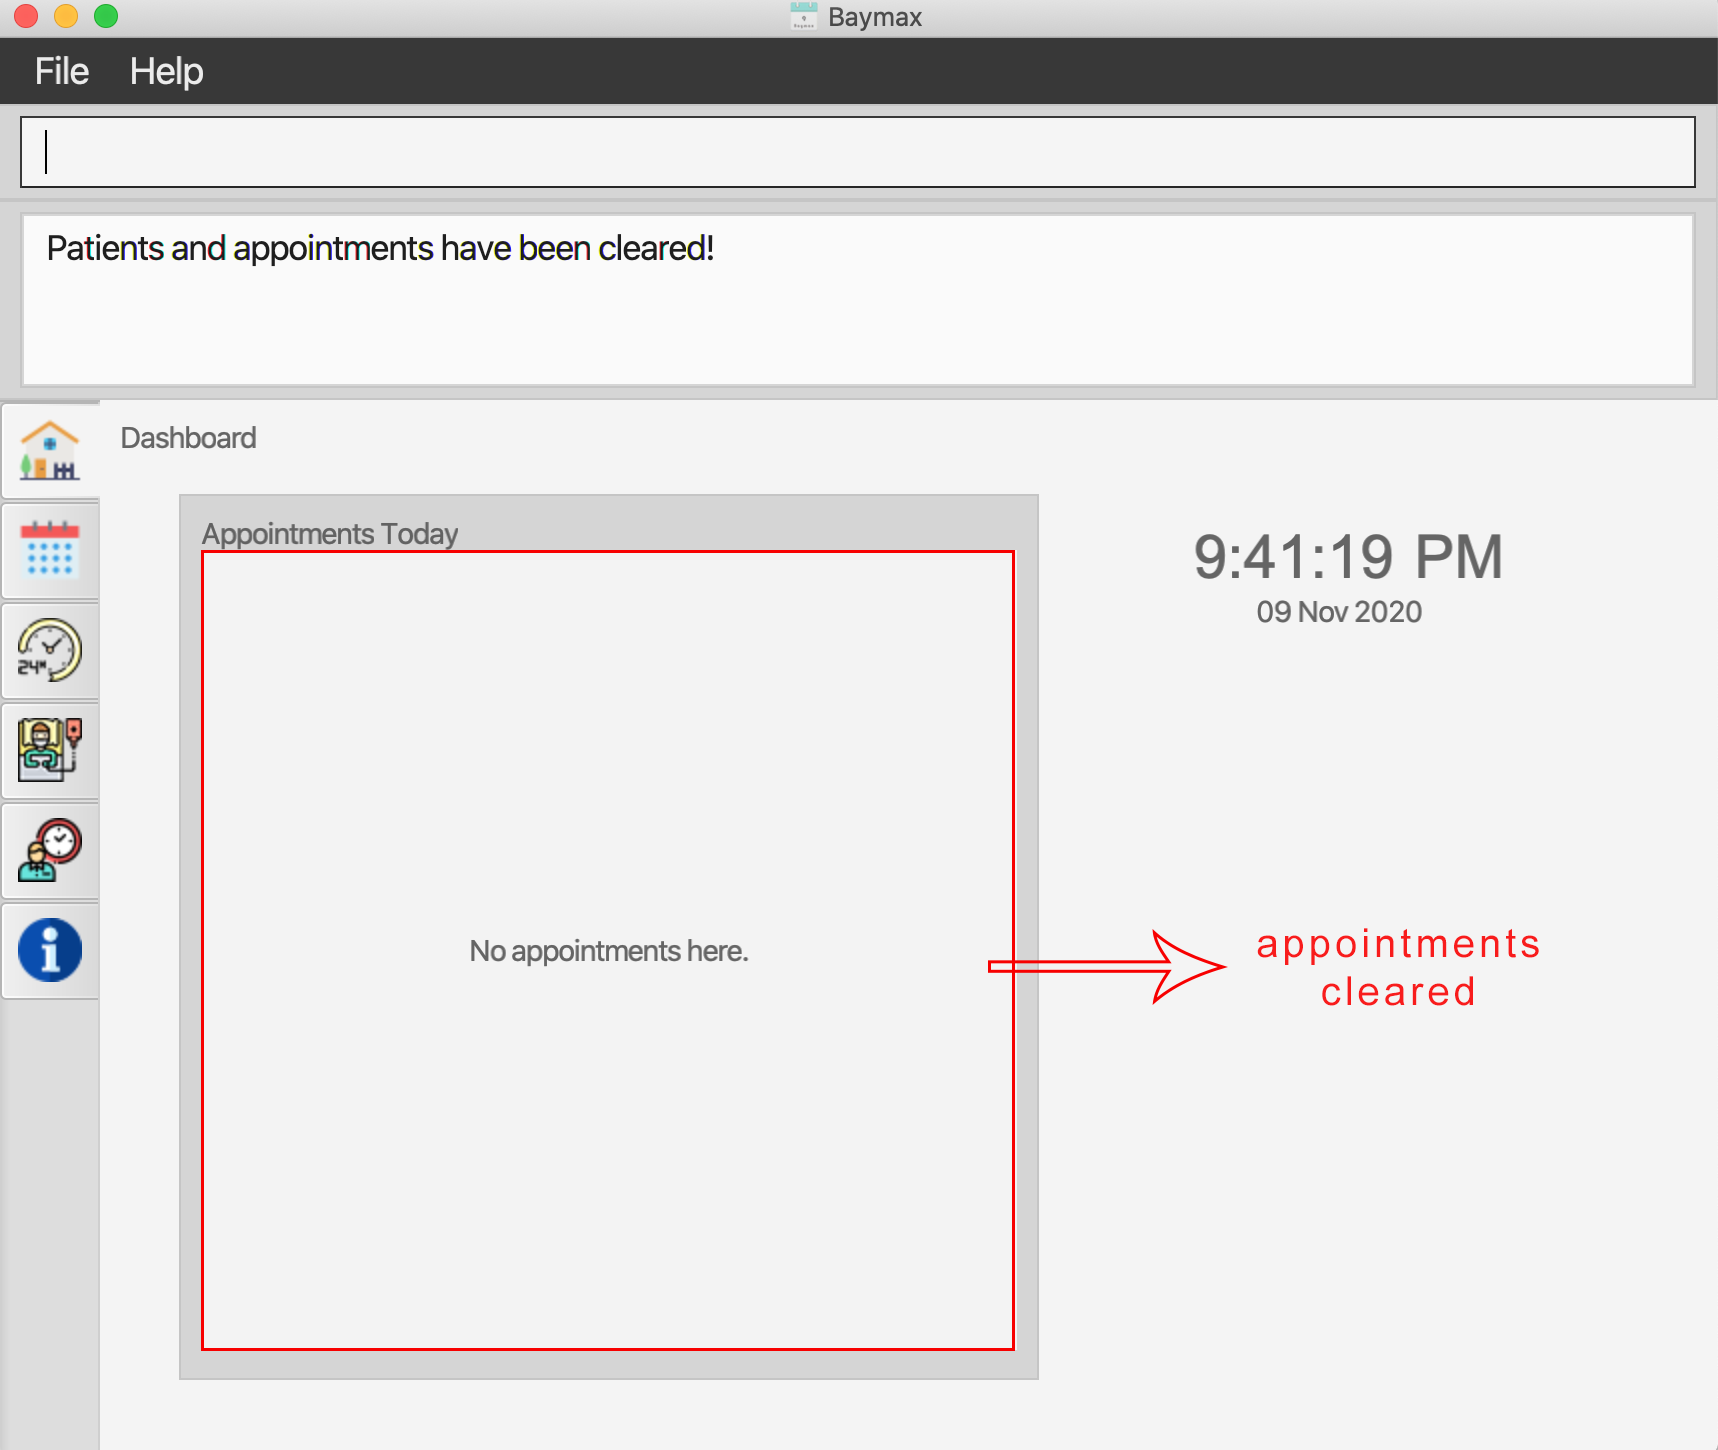
Figure 5.4.3a. Executingclearcommand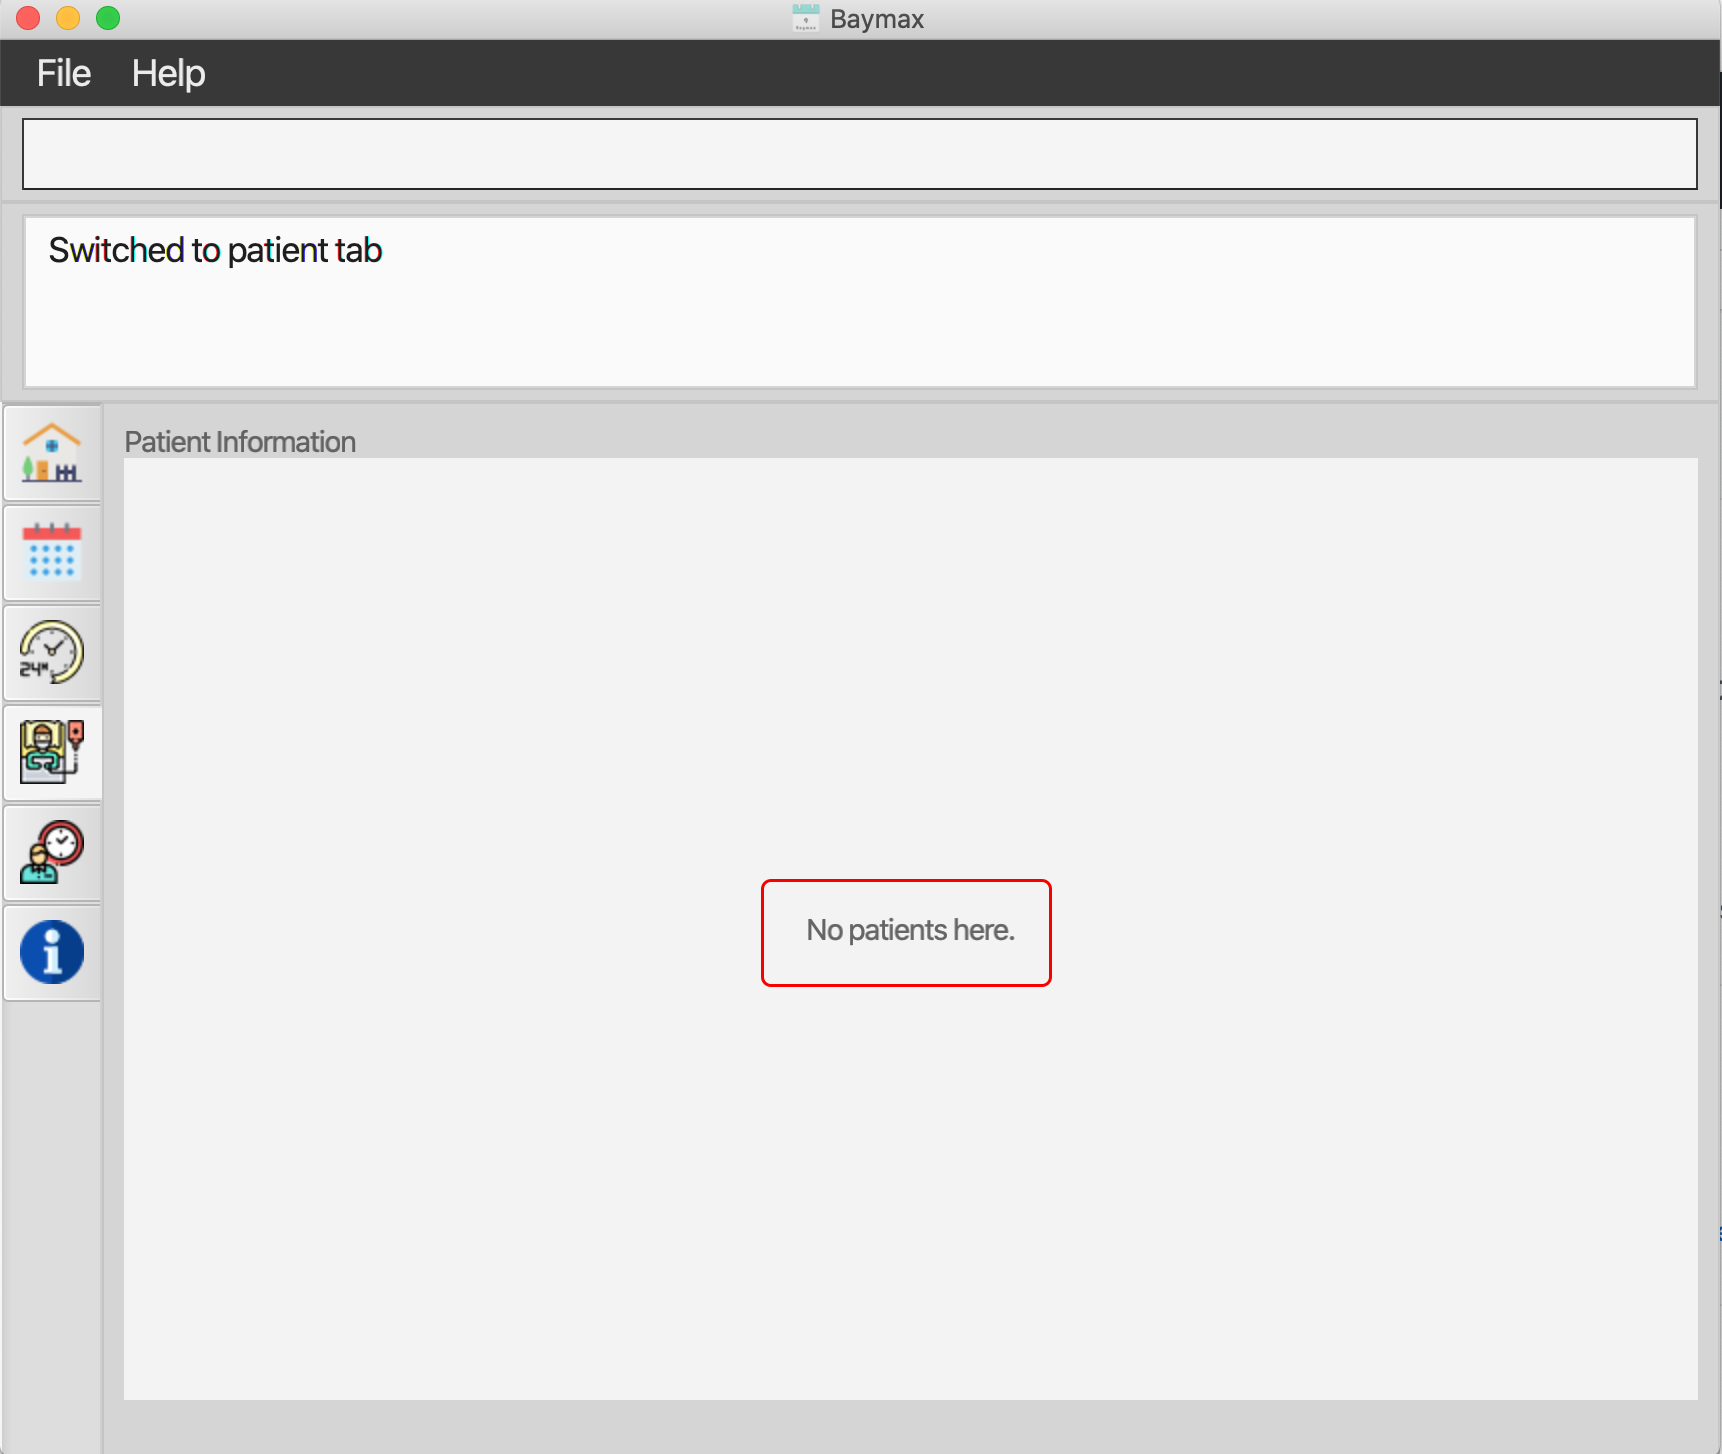
Figure 5.4.3b. Patient List whenlistpatientsis entered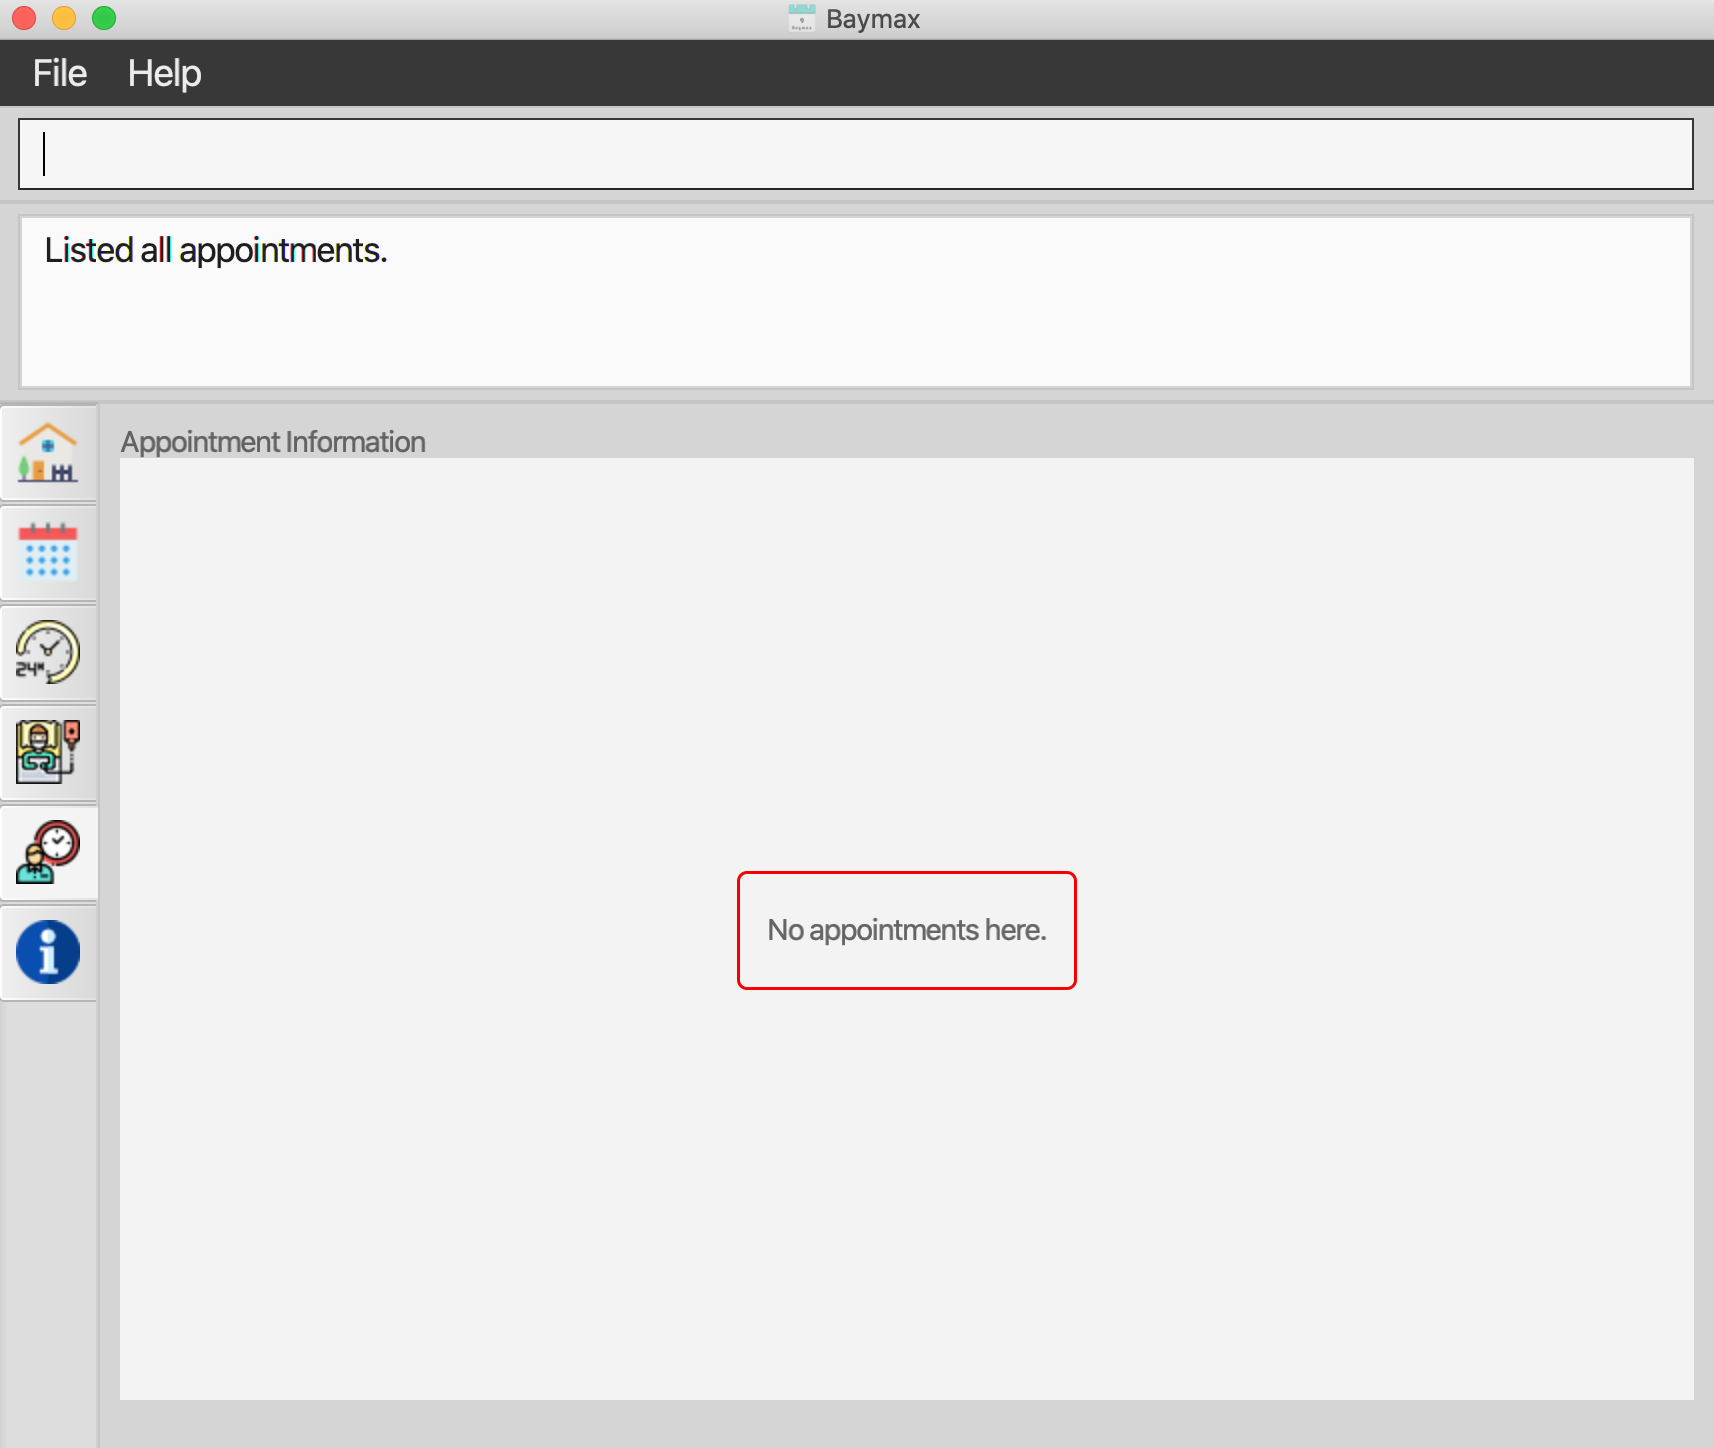
Figure 5.4.3c. Appointment List whenlistapptsis entered
5.5. Features coming in Version 2.0
We are looking forward to bringing you these new features in the next version of Baymax.
5.5.1. Undo/Redo v2.0
This feature will allow you to undo/redo the previous few commands.
5.5.2. Display appointments within a period v2.0
This feature will allow you to view all the appointments within a specified period, defined by a start day and an end
day.
6. FAQ
(Contributed by Hui Ling)
Q: Do I have to manually save any data?
A: No. Baymax saves your data to the hard disk automatically after any command that changes data.
Q: How do I transfer my data to another computer?
A: Baymax automatically saves all your data in a folder named data in the same folder as the application.
You can copy and transfer the data folder into the same folder as Baymax on your other computer and Baymax
will automatically load your data upon launching.
7. Command Summary
(Contributed by Hui Ling and Reuben)
This section summarises all the commands that are currently available in Baymax.
7.1. Patient Information Management Commands
| Purpose | Command | Example |
|---|---|---|
| Add a Patient | addpatient nric/NRIC name/NAME phone/PHONE gender/GENDER [r/REMARK] [tag/TAG] |
addpatient nric/S9772234F name/Jason Tan phone/98765432 gender/M |
| List All Patients | listpatients |
listpatients |
| Delete a Patient | deletepatient INDEX |
deletepatient 4 |
| Edit a Patient’s Information | editpatient INDEX <at least 1 patient information field> |
editpatient INDEX phone/82345678 |
| Find a Patient | findpatient NAME_KEYWORD |
findpatient Alex |
| Add a Remark | remark INDEX r/REMARK |
remark 2 r/Not free on Fridays |
7.2. Appointment Information Management Commands
| Purpose | Command | Example |
|---|---|---|
| Add an Appointment |
addappt (INDEX OR nric/NRIC) (on/DATETIME OR at/TIME) dur/DURATION desc/DESCRIPTION [tag/TAG]
|
addappt nric/S1234567C on/11-10-2020 12:30 dur/60 desc/Removal of braces. tag/DrGoh tag/1HR |
| List Appointments of a Patient | listapptsof INDEX |
listapptsof 1 |
| List all Appointments | listappts |
listappts |
| Edit an Appointment | editappt INDEX <at least 1 appointment information field> |
editappt 1 on/12-10-2020 12:00 |
| Cancel an Appointment |
cancel INDEX OR cancel on/DATETIME name/NAME
|
cancel on/20-01-2020 15:00 name/Alex |
| Mark an Appointment as done |
done INDEX OR done on/DATETIME name/NAME
|
done on/20-01-2020 15:00 name/Charlotte |
| Mark an Appointment as missed |
missed INDEX OR missed on/DATETIME name/NAME
|
missed 1 |
| Find an Appointment |
findappt DESCRIPTION_KEYWORD OR findappt TAG_KEYWORD
|
findappt eye |
7.3. Calendar Commands
| Purpose | Command | Example |
|---|---|---|
| Switch to a particular year | year YEAR |
year 2021 |
| Switch to a particular month | month MONTH |
month 11 |
| Display schedule of a particular day | day DAY |
day 15 |
7.4. Utility Commands
| Purpose | Command | Example |
|---|---|---|
| View help | help |
help |
| Switch between tabs | TAB_NAME |
calendar |
| Exit the program | exit |
exit |
| Clear all data | clear |
clear |